
Empire Deluxe Tournament Strategy Guide
Welcome to the “unofficial” strategy guide of the Annual Empire Deluxe Tournament. This document is specifically designed to support our group of tournament players as we venture from the legacy Empire Deluxe (ED) game into the world of Empire Deluxe Combined Edition (EDCE). Many of the strategies employed in ED are the same in EDCE but some have changed. The members of this community have graciously agreed to share their knowledge and allow me to post this publicly in the hopes that it will ease the transition for players as well as help new players who are interested in playing one of the greatest strategy games ever created.
This guide will cover the basic strategies of the Empire Deluxe franchise, changes to the official tournament scoring rules, and some details around specific game strategies. While most of these strategies will apply to the greater genre of Empire Deluxe games, and the screenshots used may come from a variety of sources, the guide applies specifically to EDCE. Moreover, it is specifically published for tournament players and is based on the ruleset that existed at the time I published this. It may not apply if large scale changes are made.
Table of Contents
If you don’t want to read everything here, you can quickly skip to specific sections using the links below:
- Introduction
- Key Metrics and Definitions
- Tournament Rules
- Building Units
- Strategy Breakdown
- Game Opening Moves
- Tactical Decision Making (WIP)
- Strategic Level Decisions (WIP)
- Winner’s Circle (WIP)
Introduction
This document provides guidance to players who are fairly new to EDCE. The guide will cover the fundamentals of the game, the common do’s/dont’s, opening moves, and how to recognize common strategies. However, the possibilities for how certain strategies are employed in game are endless and can only be learned through experience.
The Color Code
Throughout this guide, I will be applying a color scheme used in most tabletop gaming guides and handbooks. As a reference, here is the color coding and what they represent:
- RED – This option is bad, hard to implement correctly, or extremely circumstantial
- ORANGE – This option is okay but not the best, or is circumstantial
- GREEN – This is a good option in nearly all cases, but not always the best choice
- BLUE – Great option, you can’t go wrong when you select it
- VIOLET – Excellent option, should be taken whenever available
Situational Colors
In cases where the information has circumstantial applications, here are the colors used:
- PINK – This applies specifically to the AI and not necessarily human opponents.
GREY– This applies specifically to older versions of Empire Deluxe, and either hasn’t been tested in Combined Edition or is no longer valid.- BOLD. This references another section or unit in the guide that you can reference.
Assumptions and Expectations
This guide is specifically geared towards players who are new to EDCE. Whether you are new to the franchise or haven’t played in over ten years, it offers a refresher. Since EDCE is also a multiplayer game, it is meant to help you bridge the gap between playing the AI and playing other human opponents.
That said, I made a few assumptions when compiling this guide:
- You have played for at least 10 hours. I’m assuming everyone reading this understands the basic functions of the interface and the game mechanics.
- You have read the important components of the manual. In other words, you know what cities do, what supplies are, what units cost, etc. I’m not re-writing the manual in this guide, so if you can find it there I will assume you know it already. Moreover, it’s assumed you left the primary game mechanics to their expected settings such as leaving drain rules on for human players.
- You are using the Enhanced Unit Set and Random Maps. This guide focuses on the Enhanced Unit Set. It is written using the Worlds of Nations random map generator, but any of the standard ones provided by EDCE will apply. Scenarios and pre-generated maps may be mentioned in some specific cases below.
- Maps are 200×200 size. I consider this to be moderately large to large depending on your style of play. Smaller maps will have faster action and tend to influence a quicker style of play.
In addition to those, I am assuming you are one of three types of players who are reading this. In which case, I’m hoping you walk away having learned something.
- Brand New Players. This guide will hopefully kindle an interest in playing EDCE or maybe you played and are having trouble with the AI. This guide will help you around that.
- Returning Players. If you are like me and played Empire Deluxe Legacy but skipped EDEE, the new mechanics are a bit different and require some getting used to. I’ll cover those mechanical differences.
- Experienced Players. My hope is to create a more challenging multiplayer environment by making newer players harder to beat.
I think that covers all of the preliminaries, so let’s get into the real subject matter.
Key Metrics and Definitions
Since Empire Deluxe is a game of probabilities, you need to understand some basic formulas which are used throughout this guide to calculate the effectiveness of strategies. These formulas are also used for the Empire Tournament Championship scoring as well. Calculations that refer to one of these fomula’s will reference the names in bold.
City Value Scoring (CVS)
Formula: CVS = nCity (city efficiency / 100)
Example: The Blue Player has two cities, one with an efficency of 100 and another with 80. At the end of the turn, the Blue Player have a total of 1.8 points
CVS is a measure of your total production capacity. This is usually shown as a ratio against the total number of cities owned. A good score should match the number of cities you own. If the number is greater than the number of cities you own, your production capacity is ideal. If it is less, you should improve it by building your efficiency.
This shows how many points you can put against the standard build times of all units. The higher the number, the faster you build things in general. Typically, the player with a higher value is in a better position to win the game. This measurement is used to determine when it is the right time to convert some of your lower production city from producing cheap units to performing efficiency improvement.
City Capture Ratio (CCR)
Formula: CCR = total cities owned / game turns completed
Example: After 100 turns, the Red Player has seven cities. At the end of this turn, Red Player’s CCR will be 7% (7:100) and will added 0.07 points to his cumulative CCR.
CCR is a measure of how many turns you need to capture a single city. This is usually shown as a ratio rather than a percentage. A good ratio is 1:12 (8%), whereas a poor ratio is 1:24 (4%). Anywhere in the middle of that range, prior to encountering an enemy, is considered average. Anything higher than 1:12 is very good. This ratio is important in early game before you meet your opponent.
Your ratio will never be higher than it is on turn 1 (1:1). An average city capture ratio prior to meeting your opponent is 1:18. If your ratio is at this number or better, you are winning the game. Once you find your enemy, this number will start to trend downward (1:24 after 100 turns, 1:30 after 200, etc), where it will become an indicator if you are winning or losing the game against your opponent.
Damage Cost Ratio (DCR)
Formula: DCR = (total units * total cost) / total damage value
Example: The Blue Player decides to built two infantry units which takes 12 turns in total. The two infantry have a cumulative damage value of 2 (1 + 1 = 2). On turn 12, Blue Player will have added 6 points to his total DCR.
This formula calculates the cost to build one point of damage output. This is usually shown as a numeric value and usually subtracted from total scores. An ideal DCR score is 4.0 whereas anything over 10.0 is considered poor. A score of 6.0 is considered average.
The lower the number, the more potential you have to make offensive action. If your ratio is higher, it means you have too many support units and are not optimized against your drain requirements. If your DCR is higher than your opponent, you are also considered to be defending or losing an offensive engagement.
Damage Combat Value (DCV)
Formula: DCV= (attack value * %chance) * HP / total cost + (support value * %chance) / total cost
Example: The Blue Player decides to build a Cruiser to fight a Red Carrier. The cruiser has an attack value of 8 and 8 hitpoints. The carrier has an attack value of 4 and 8 hitpoints, but also carries 6 aircraft. Blue has a DCV of 0.11 and Red has 0.09 (Red score is 0.11 in ED ruleset) meaning Blue has the upper hand.
DCV measures the value of your points of damage by weighing their effectiveness. This is usually shown as a number and as a percentage when compared against another unit. A good value is usually 8%, with a poor value around 5%. An ideal value is anything over 10%.
These numbers are not meant to compare two units against each other. This is usually used in scoring for units that are still in play at the end of the game.
Combat Success Percentage (CSP)
Formula: CSP = SUM{nHP(%chance * damage)} / enemySUM{nHP(%chance * damage)}
Example: The Red Player attacks an enemy Battleship with a cruiser. The cruiser provides a sum of 4, whereas the battleship has a CP of 6. The cruiser success percentage is 33%.
CSP measures your combat odds when attacking. This is usually shown as a percentage. An average value is 50%, whereas anything under 50% is considered poor and anything over 60% is considered ideal.
This is the probability of a unit winning a combat when on offense. The probability changes as each combat round continues, which is represented as nHP in the formula. This is used when determining how effective your units will be in a specific situation but is not the best measurement. CSP can be used to calculate values of multiple units to calculate general strength against an opposing force.
Combat Risk Points (CRP)
Formula: CRP = HP / enemyCOUNT{nHP(%chance * damage)} – COUNT{nHP(%chance * damage)} (divide by total HP when used in scoring)
Example: The Blue Player places three infantry in a forest to block a Red armor and a Red infantry. The three Blue units score 4 points, while the Red units score 6. The CRP is 6 – 4 = 2 points.
CRP measures the strength of your defensive positions. It is usually shown as a point value and is used in scoring. A score that is greater than your total hitpoints is considered good, while a score less than your total hitpoints is considered bad.
This is the probability of a series of units losing a combat in its defensive position. It assumes unfavorable odds to predict the worst outcome. This score is best used when calculated across a front and is more popular for tournament games where Set Matches are common. It can be used to calculate the odds by adding hit probability as well.
Recon Spectrum
Formula: RS= (unit distance * unit range + sight distance * 2)^2
Example: The Red player uses a fighter to do recon around a city. The fighter has a speed of 6 and a range of 3. The Recon Spectrum is 400.
This formula calculates the maximum number of tiles a unit can patrol from a single location. It is always shown as an integer value. For units that do not have a range, this measures their detection ability from a static location.
This formula is closely related to Pathing Cycles, in that a cycle cannot exceed the tiles within this grid. It is also used in scoring for Set Matches. You can also replace damage with the RS value in the DCR scoring to determine the cost of recon (referred to as RCR) which is used in some advanced unit sets.
Recon Pacing
Formula: RP = range * (8 OR number of cycles being compared)
Example: The Red player uses a bomber to complete a full Recon Spectrum of its starting city. With a range of 6 and a speed of 4, the bomber has a Recon Pace of 48.
This formula is used to calculate the minimum time required for a recon unit to complete a full recon spectrum. This finds the Second Standard Deviation, assuming a standard population distribution, of the area you are patrolling. The number is always shown as an integer.
The formula is used to determine how efficient your units are at performing recon. Overlaps in recon grids, circular paths, and frequent basing reduce your actual score. The most common use is when planning production by determining how long an aircraft has to explore an area before switching to another patrol path. You can also use this to determine if an AI aircraft is stuck in a pathing loop and can therefore be bypassed without committing resources to destroy it.
Pathing Cycle
Formula: PC = (path distance / unit speed) * 2
Example: The Blue player uses a bomber to patrol an area. With a speed of 4 and patrol range of 12, the bomber has a Pathing Cycle of 6.
This formula is used to determine how long it takes a unit to complete a single patrol path. The number is always shown as an integer, rounded up. Pathing Cycle is usually a component in other calculations such as Recon Spectrum and construction queues.
The most common uses are for air patrols and transports. A cycle is useful when calculating the best options for constructing units. For example a Transport on a convoy path that takes 12 turns will always have exactly 1 Armor waiting for it when it completes a cycle.
Production Management Scoring (PMS)
Formula: PMS= (CVS / total cities) * drain percentage
Example: The Blue Player has a CVS of 1.8, 2 cities, and a drain percentage of 80%. This means is PMS score is 72%.
PMS calculates how well you are managing your production capabilities within your empire. It is usually shown as a percentage. An ideal PMS is 200%, whereas anything under 80% is considered poor. A PMS of 100% is considered average.
A high PMS means you have good production capacity and are able to produce units faster than normal. A low PMS score means your production is slower than normal. In terms of scoring, the PMS is usually weighted against your total CVS score.
Target Value (also Target Value Percentage)
Formula: TV = total units * total units list cost, TVP = Team 1 TV / Team 2 TV
Example: The Blue Player has a Transport with three infantry on board. The TV is 48 (30+6+6+6).
Target Value calculates the relative cost to produce a unit. It is always shown as a point value, and as a percentage when calculating the value of two opposing sides. A TVP of 1 means two armies are evenly matched. A TVP less than one means you are at a disadvantage, whereas a TVP over 1 means you have an advantage.
TV, DCV, and UTR are closely aligned. All three measure the true value of your army. TV calculates the value of all units, regardless of the time to build or the offensive capability. Usually this metric is used as a comparison with other metrics to see if you are building more support units, offensive units, or are dealing with production issues within your empire.
Unit to Turn Ratio (UTR)
Formula: UTR = (total units produced * total units list cost) / total turns used
Example: The Red Player five Infantry on Turn 22. The listed cost is 6 turns. That means his UTR is 1.36.
UTR calculates how efficiently you are building units. It calculates production, not combat values. It is a multiplier value but shown as a percentage (due to efficiencies being percentages) and is calculated for score as a number. A UTR over 100% is considered good, while anything under 80% is considered poor.
UTR is usually seen measuring how well you are at planning unit queues. If you make constant changes to your queue, the percentage will be lower. If you are consistent in your production, the percentage is higher. It is used as a scoring mechanism in some special circumstances, but is usually a guide, especially for early game production and for determining when to attack or defend cities.
Tournament Rules
This section covers the key rules and scoring as it pertains to the unofficial Empire Tournament Championship (EDTC). If you do not participate in the EDTC, you can skip this section. However, some of the scoring mechanisms in the Tournament Scoring section are referenced later in this guide when explaining the pro’s and cons of strategies.
Game Setup
The following instructions apply to the game and tournament setup in order for it to be scored:
- Official game maps are provided to all players in advance of the tournament date. Generally, this process starts a month prior to the tournament with final map selection a week before the tournament starts. Players have ultimate authority on how to govern this.
- Players agree to a minimum of 50 turn audits, but may be modified based on player agreement. A moderator who wishes to act as spectator will be responsible for pulling the saves for scoring.
- The EDTC team will identify one player to act as the official game moderator. For multiple round tournaments, this position is rotated among players with one person designated as the official score keeper.
- EDTC requires players to be co-located. This rule has been amended to allow remote play for EDCE.
- All house rules are agreed upon in advance and recorded by the moderator before the start of the game. The most common house rule is for starting neutrality for smaller maps.
Game Moderating
All EDTC games have a dedicated moderator. In legacy Empire Deluxe, the moderator was responsible for posting game results and settling disputes in scoring. Since EDTC games in EDCE are streamed, moderators are responsible for maintaining the streams between players and ensuring consistency in turns. Below are the guidelines moderators follow for rated games:
- Moderators can opt to be spectators or players, depending on the setup of the game. A 1 vs. 1 game requires a third moderator to be present as a neutral player for streaming purposes
- All Set Matches (see scoring) are recorded by the moderator. Records include turn stamps, beginning and ending scores, decisions for best play, and Set Match winners.
- Moderators are responsible for handling disputes, including such things as intentionally exploiting known bugs, breaking house rules, and save scumming.
- Moderators take and archive save files throughout the game. These include all milestones (50 turn increments), Set Matches, and any benchmarking saves required for offline scoring.
Buy Points
The following rules apply when using buy points. If a moderator is present for the game, and is not a player, they must be approved prior to the game start.
- Buy points must be used for all unit purchases prior to making intelligence purchases (aka buying tiles).
- Buy points cannot be used for city purchases. This must be agreed upon in advance as per the Game Setup rules.
- Maps that use buy points that are based on starting locations (locations that have extra buy points due to positioning of starting cities) must be announced prior to city start. The map and points must have at least 35 playthroughs with calculated results in order to be used in a rated game.
- Players can agree to limit buy points to certain unit types only. This is regulated by a moderator.
- Players may opt to have the moderator pre-configure a scenario with the buy point allocation in lieu of doing it during game setup. This can be done to maximize playing time during a tournament, especially for larger maps or larger numbers of buy points.
Set Matches
A Set Match, also called important engagements or public statements, is an action called by a player during a tournament. It is often compared with called “check ” in chess. Moderators have special actions to take when a Set Match has been called.
- A player can call a set match at any time during the game. The Set Match must be reviewed by the moderator and the player must have at least one unit in the vicinity to call a Set Match.
- The player must designate an “exclusion zone.” This is a defined grid on the map (using X,Y coordinates) where the Set Match qualifies. Any player with a unit in that area is given the option to accept the Set Match or decline it.
- The following rules apply based on player responses:
- If only one player acknowledges the set match, all special scoring is applied without any modifiers added.
- If there are more than two players in the zone, if one of the players accepts and all other players decline, all special scoring is applied with a 25% modifier added.
- If all players in the exclusion zone agree, all scoring is multiplied by 150%.
- The zone ends when the players inside the exclusion zone declare victory or defeat. Moderators can also end it when it is deemed necessary, even if players disagree.
- Set Matches apply the following additional scoring which is not calculated by default:
- DCR penalties are applied to any unit created within the exclusion zone.
- The player who called the Set Match takes a 50% DCR penalty for any units added from outside the exclusion zone. This rule doesn’t apply to any units considered “reserves” and documented by the moderator when Set Match was initiated.
- Defending players (all players who did not call a Set Match) can add units to the exclusion zone without penalty.
- CSP score is applied to all combat that occurs inside the exclusion zone.
- CRP score is applied to the players score for any unit which ends it turn adjacent to an enemy unit. This is also applied to units that fly adjacent to an enemy unit but not no engage.
- At player request, players can request Recon Spectrum Points (RSP). These are reviewed by moderators. If a unit is undetected but within Pathing Cycle values, it receives points equal the Recon Spectrum value of all units within sighting range of that unit.
- City efficiencies are awarded to the owners when the Set Match ends. If all players agree to the outcome, the bonuses follow the exclusion zone bonuses when calculating this score. Scoring uses unweighted CVS scores in calculation.
Set matches are lucrative point mechanisms but limit the amount of outside interference allowed. Moderators are also required to closely scrutinize points and are therefore able to make house rules as needed in order to enforce the set match.
Tournament Scoring
Unless otherwise noted, the tournament scoring uses the default formula’s for tournament scoring. You can refer to the Strategic Scoring section of this guide for the specific formulas, which will be highlighted in black wherever they are referenced:
City Value Scoring
- Score is cumulative over time, calculated every 50 turns or at an interval agreed upon by players and moderators. In standard game set up, all players start with a CVS of 1.
- The CVS score is weighted against your PMS score. This has the effect of a double impact to poor performing cities.
CCR Scoring
- Score is cumulative over time, calculated at the end of each turn. In standard game set up, all players start with a CCR of 1.
- Players may request to re-set CCR Game Turns once a player is eliminated. The request can only be made after Turn 200 and if the moderator agrees.
DCR Scoring
- DCR is only subtracted from a player’s score when built during the Set Match.
- DCR units calculated in scoring must be built within the player’s designated exclusion zone.
Combat Scoring
- Combat Scoring is a cumulative score calculated at capitulation or game end. It is the DCR killed – DCR lost.
- EDCE Rule change on 10/2020: Combat Scoring use support damage value instead of standard damage values for calculating DCR.
End of Game Scoring
- All units still surviving at capitulation or game end add to score. The formula for this is DCV * PMS.
Building Units
Units make the core of the game. You spend the majority of your time strategically moving them around the map making decisions that are based on probabilities.
There are generally four categories of units – land, air, sea, space. Then there are improvements which are technically considered units but are only built by other units.
The order in which you build units and expand determines how well you succeed at the end game. Below are my default suggestions toward which units you should focus on throughout the game, not just in your opening moves. As I go through strategies, I will provide tweaks to this list that are specific to that strategy. Wherever I don’t mention a specific tweak or preference, you can assume the list below applies.
Land Units
There are seven land types:
- Infantry. Good in some circumstances, and cheap to produce quickly if you need land units in a pinch. Other options are better though and not all that more expensive. By mid game you shouldn’t be building any due to drain impact.
- Armor. The best land unit in the game. Will out-run infantry, has two hitpoints, allows two attempts to capture a city before dying, and can be repaired.
- Light Artillery. You’ll need these on the board just for their threat factor as several strategies require them as a deterrent. Don’t count on them to win games though.
- Heavy Artillery. Too unwieldy to make them useful in most circumstances. Their range requires spotters which just makes it harder to use.
- Anti Air Battery. Fighter screens are cheaper and more reliable. Useful against missiles, but if you need them for this purpose you did something wrong.
- Trucks. Needed to move certain things around. But you’ll find it more convenient to just use other units which can move on their own.
- Engineer. Slightly more expensive than Armor. Can capture cities without losing the unit, and can construct things. A great combination if you can afford the purchase price.
Ground units serve one goal – capture as many cities as possible. If you are building ground units, decisions should be made with this one goal always in mind. Only in longer games will you need support units as combat becomes more complex.
Air Units
There are four air types:
- Fighter. A Good, not great, choice. They are best used as recon, and fight like infantry when needed in a pinch.
- Bomber. Best choice due to its versatility. These are to Empire Deluxe what Knights are to a game of Chess. Only downside is their poor exploration capability.
- Helicopter. You won’t need to build these until late game. They are difficult to use, very situational, and expensive.
- Air Transport. Limited range and speed made the Transport and Helicopter more effective and versatile options. Steer clear of this unless your map has heavy mountains and peaks and very little water.
Air units serve two vital functions. The first is recon, and in this capacity they have two of the best units in the game (Fighter and Bomber). Their second function is in attacks of opportunity, which you should take whenever the odds are in your favor.
Air units also possess a third function as a transporter, but this is not something I would say is their strength. There are a few circumstantial cases that make Helicopters useful in this capacity, which will be covered below, but it is hard to do properly and requires some experience to do effectively.
Sea Units
There are eight ship types with variable capabilities:
- Patrol Boat. Ability to travel on rivers and its transport capability are not enough to make up for its cost and the fact it is outclassed in all terrain types where it operates.
- Transport. This is the best transporter in the game and you won’t replace them until late game. Even then, you will only be moving them to a secondary role. It has no equal.
- Destroyer. More or less the infantry of sea units. You use them as cannon fodder and scouts. Fans of legacy Empire will remember them as they were, not as they are. In EDCE, they are outclassed in their role by other ship types.
- Submarine. Surface range of 3 makes them better scouts than destroyers due to the ability to submerge in a pinch. When deciding between destroyers and subs, take the sub instead.
- Cruiser. You’ll need at least one in your fleet, and for long games they will be the bulk of your capital fleet. Use them for their bombard capability and threat presence, but should rarely see combat otherwise.
- Battleship. Nearly twice as expensive as cruisers and only 4 additional hit points. Their only use is for cruiser hunting, and there are better/cheaper options for this purpose.
- Carrier. Basically a cruiser that trades bombard ability to carry aircraft
and has better anti-aircraft defences. In late game, these will replace your transports if you still need amphibious assaults and it is then indispensable. - Seabee. Able to travel on land and sea. The majority of your supply spots will be on sea tiles on random maps, making them useful if you are having drain problems.
Sea units serve to eliminate shallow/sea tiles as barriers for your expansion. Their primary function is to serve as transporters for your ground units. Secondary is the ability to support amphibious landings and soften up enemy positions prior to a landing.
Most sea units focus on their sea to sea combat capability. However, ship vulnerability to air attack and the expensive nature of each unit means you should avoid pitched naval battles in all but the most extreme circumstances.
Space Units
There are six units classified as space units due to their orbit capability:
- Satellite. Decent patrollers. Their presence on the orbital domain makes them hard to defeat. This is the most useful of all orbital units.
- Armed Satellite. Basically a combined satellite plus missile in one unit, both in capability and cost. That basically makes it a more expensive missile or a more expensive satellite. Too costly to use in either capacity.
- Short-Range Missile. More expensive than a ground unit, and one shot use. Build them to shoot down satellites. It’s too expensive to use in another capacity.
- Long-Range Missile. Extra range is not worth the cost. Your points are better spent on something else.
- Short-Range Nuke. 78 points on a 50% chance to detonate a tile? That makes the actual cost 156 points to destroy a tile, and 234 points once you factor in air defence. You still have to get it in range as well. You have better ways to spend these points.
- Long-Range Nuke. Same as short range nuke but double those costs. The only time you would use this instead of the cheaper nuke is if the target is a tile or two out of range. You shouldn’t see this ever appear in a game IMO.
The only thing orbital units do well is patrol and recon. If you are using missiles for anything other than shooting down satellites, you either won the game already or have too much cash to burn.
The main challenge in missiles is the fact that your opponent has a minimum of two turns to respond due to launch requirements. And you can only launch once per turn from each location so you have to position them carefully to be effective.
Improvements
Some units have the ability to affect the balance of the game by modifying the terrain features. From a game mechanics perspective, these are technically considered units so they are included here.
There are six types of improvements.
- Airbase. The number of airfields you build is directly proportional to the density of cities on the map. The lower the density, the more airbases you need to provide effective air coverage.
- Oil Field. This is the main reason for building Engineers and Seabees. They are the cheapest way to remove the drain effects, but mastering supply lines is somewhat hard and makes their secondary capability difficult to use.
- Port. Use these to connect inland cities to the water. Useful if you have high efficiency inland cities since ships are generally expensive.
- Fort. Useful when massing units in key choke points and can be a game changer. But the complete vulnerability to a 12 point ground unit makes it too risky to ever use.
- Mine. A 4 point 50% chance to hit tile enhancement and takes time to build a wall of them effectively. That said, don’t underestimate it’s invisibility to most units. Amateur players and AI opponents forget there are invisible dangers on land tiles. This is a good option against the AI once you have finished all of your oil field and airbase construction.
- Road. Despite what the name implies, this improvement doesn’t make trucks and armor go faster. Easy to destroy, and your opponent can use them too. Better to use terrain obstacles to your advantage than try and eliminate them.
Improvements serve to add some flavor to the map. Engineers and Seabees exist solely to provide this strategic element. Oil fields are basically free drain reduction and should always be your first priority.
Airbases, Forts, and Ports all have limited value depending on the situation on the map. Airbases provide the most benefit due to extended bomber range, but that’s it.
Roads and mines are always the lowest priority and between them mines provide value. Roads are more likely to screw you over in a competitive game than help you.
Strategy Breakdown
Now that you know the baseline values for each unit, let’s talk strategy. Building units is one thing, but moving them around the map properly is what wins the game. To do that properly, you need to be thinking about your immediate moves and how they will impact your long game.
The strategies covered from here on out can be broken into three categories:
- Game Opening Moves – The moves you will make in the first 100 turns. These will describe how to approach your first turn, what you will expect, and what the impact will be on your long game.
- Tactical Decision Making – These are the moves you will make when moving specific units through specific scenarios. These are situational cases that I will set up in the opening comments. It will focus on identifying the strategy, how to use it, and how to defend against it.
- Strategic Level Decisions – These are decisions you will make across your entire front. They focus more on the long game and how to win on a campaign level rather than a specific situational case.
These strategies depend heavily on the assumptions I laid out earlier in this guide. Be sure to adjust your expectations accordingly if your scenario parameters change. Furthermore, I am assuming a basic start (no buy points or pre-determined scenarios), 200×200 map or larger, and starting cities at 100% efficiency with 2 cities on starting island.
For each strategy, I will use the color coding system to demonstrate its overall effectiveness as a new player. This factors in the success rate of the strategy as well as the complexity. For newer players, more complex strategies may take a few playthroughs before you can get it right.
Game Opening Moves
Many game outcomes are determined by how successful you are in the first 100 turns. If you do poorly, you can end up taking the rest of the game to catch up. Not all of this is luck though. There are a few general strategies that work better than others.
Here is the summary of strategies and their general effectiveness. For information on how to approach it, find the header below where it is explained in detail.
- ASL Expansion Doctrine. Your gut will tell you it’s ineffective because you are doing things backward, but the statistics support this as one of the most consistent expansion options.
- Hail Mary Doctrine. This is a common tournament strategy and the fastest to victory, but the worst option for new players who don’t know how to use it.
- Infantry First Doctrine. This should be the first one you learn to do. It’s not the best, but it is the easiest.
- Anticipate 4-Ex Doctrine. A good mid-level strategy, best used once you have an understanding of each unit’s strengths and weaknesses.
- Air, Land, Sea Doctrine. This is the most common strategy used by players and AI. It’s output by Turn 100 is noticeably “linear” from a statistical standpoint and thus is not recommended by experienced players.
In the details below, I will cover the basic difficulty level of the strategy. I have provided the Order of Operations which is the suggested build order and what turn you can expect to be making a decision. Lastly, I provided a step by step guide on the best approach as well as suggestions and screenshots to supplement the recommendations.
ASL Expansion Doctrine
- Difficulty – Medium. This is a by-the-book approach. A mis-step will cost you.
- Speed – Fast. Statistically proven to be fast, but only if done properly.
- Risk/Luck – Low. Because it eliminates outside factors, its outcome is fairly reliable.
The Air, Sea, Land (ASL) Doctrine is a moderately difficult opening move to master, but is one of the most consistent in outcome. Like moving a pawn in your first Chess move, it’s low risk low reward and sets you up for the best secondary moves possible. A new player should be able to master it after two or three playthroughs.
Order of Operations
Here are the steps for this strategy and a general idea of which turn it occurs:
- Turn 1: Construct a Bomber
- Turn 12: Construct a Transport
- Turn 42: Construct Armor
- Turn 54: Load your first Armor on the Transport and head to the nearest island.
- Turn 66: Use next Armor to capture local cities
- Turn 78: Repeat step 4 and 5 until all nearby islands are captured.
Step 1: Construct Exploration Vehicle
The first item to construct in this doctrine is an aircraft for exploration:
- Fighter. Only useful if you build infantry on Step 3 below.
- Bomber. Best choice and can be set to auto explore.
- Helicopter. Too expensive at this stage in the game.
- Air Transport. Transport + infantry is a cheaper option at this stage.
Whatever you build, you can usually put it on auto explore. The direction you start the exploration pattern doesn’t matter. If you use Bombers, it takes 6 turns to complete the first Recon Cycle, and 48 for the starting Recon Spectrum. By then you will have moved into Step 4 below.
Using Fighters is a bit less forgiving. It takes 3 turns per Recon Cycle, and 24 to complete the starting Recon Spectrum. This looks great at first, however the tradeoff is that in the same timeframe to get to Step 4, you will have at least 312 fewer explored tiles. That’s almost 40% of your potential exploration capability. For this reason, it’s generally recommended that you don’t use fighters unless you expect to find your enemy within 100 turns.
Another reason to pick Bombers is their long-term viability as explorers. In larger maps, you can reasonably assume the first 200+ turns of the game will be dominated by exploration and expansion. After you complete your initial exploration pattern, you can mostly leave them in auto-explore and move to other things.
Step 2: Construct Transportation Vehicle
The ASL Doctrine says your second step is to build a transport vehicle. Here are the standard options and their viability in this role:
- Trucks. Worthless as they can’t go across sea tiles.
- Air Transport. An acceptable option only if you uncovered several nearby islands that are within dropping distance.
- Helicopters. Same issue as Air Transports, but only carry infantry. These are not your best option this early in the game.
- Patrol Boat. If your islands are close and only have shallows between them, do this. Otherwise you need a proper transport.
- Transport. Hands down the best option here. 6 infantry (or 3 armor) means it won’t have to constantly return to refill once you get going.
- Carrier. Too expensive this early in the game, and has no immediate benefit over Transports.
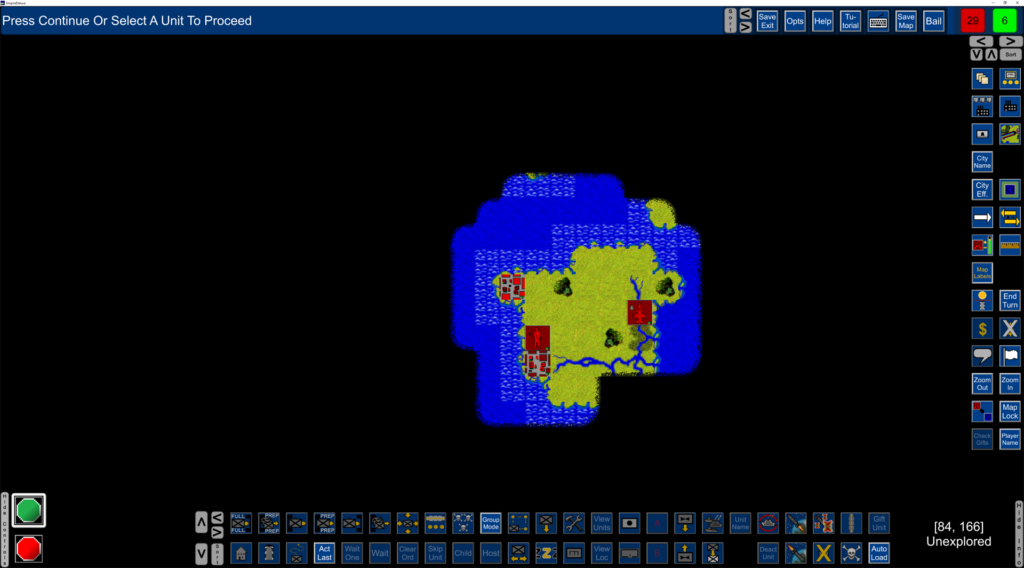
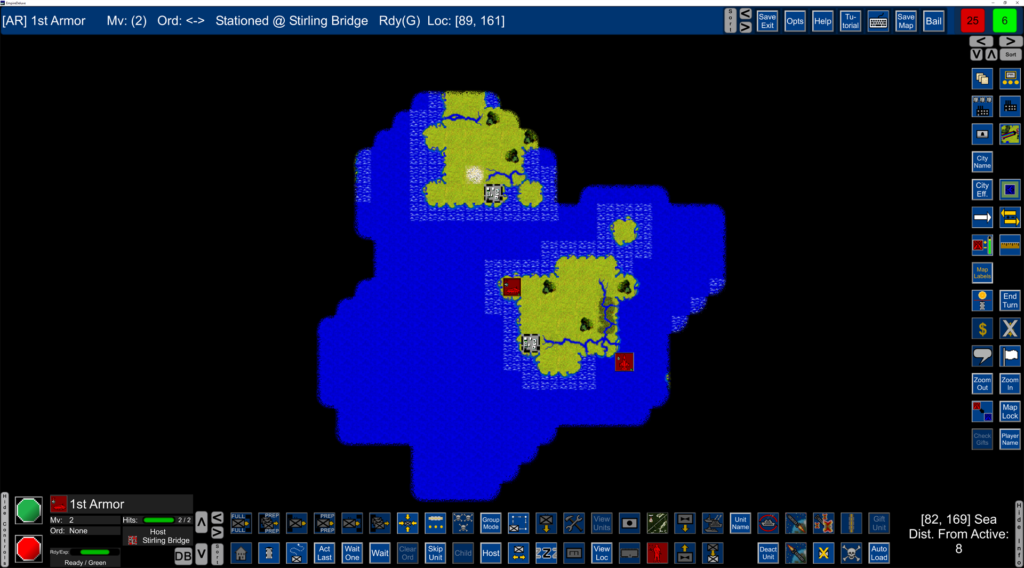
This is the hardest part of the strategy, in my opinion. Your gut tells you that building a transport with nothing to carry is a waste of time. And, well, your gut is right. However, this is typically what the maps will look like at the point where you finish your transport.
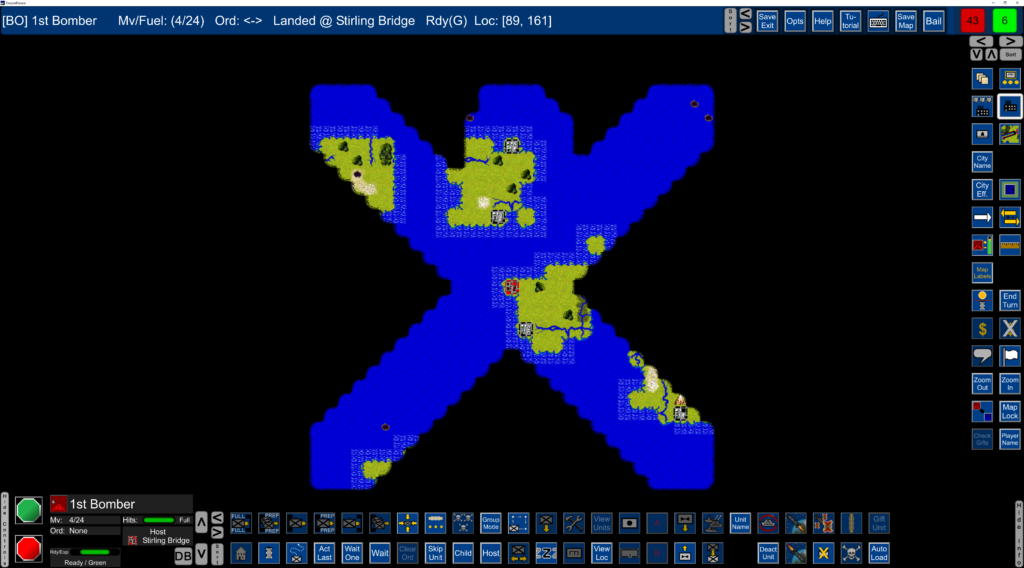
40 turns in and you have uncovered more cities remotely than on your home island. Which brings us to Step 3.
Step 3: Construct Land Forces
The ASL Doctrine says your third step is to select the type of ground force you will be using on your expeditions. This is a long-term choice, so choose wisely and expect to leave it that way for the next 60 – 100 turns.
- Infantry. Fastest way to get your transport off your island. The only downside is the 50% CSP,
or less if amphibious, which means a good portion of your opening assaults will fail. - Armor. The best unit for sea transports. 75% CSP gives better odds at city capture and once landed, double the movement speed at the cost of only 6 turns. Plus the possibility of capturing two cities with one unit.
- Light Artillery. No offensive capability
- Heavy Artillery. No offensive capability
- Anti Air Battery. No offensive capability
- Trucks. No offensive capability
- Engineer. Better choice than infantry, especially if cities are on the coast. Provide the most versatility, as they can do improvements and capture an unlimited number of cities. Their drawback is the 50% CSP,
or less if amphibious, which means your armor will get a better CRP value in the long run.
This is where the statistics say this strategy works best. Since you have already constructed your recon and transport, you will set production to this unit and leave it indefinitely. As a result, you get a production bonus from here on out.
You will be tempted by the cheap Infantry option, but the statistics say this as a bad option. Most continents away from your home base will have a Pathing Cycle of greater than 12 tiles (i.e. 6 turn travel distance). Infantry have a CSP of 50% in this situation, so building Infantry in the hopes of saving 6 turns will actually cost you 12 turns minimum. 12 turns, coincidentally, is the construction cost for an Armor.
Remember, ASL is about maximizing your statistical probabilities. The 75% CSP of Armor is really your best option here. Engineers are an enticing option, but that 50% CRP will hurt them just as much as Infantry. The only circumstance where you are better off building Engineers is if you have a lot of good construction options nearby, and in late game this will be more valuable.
Step 4: Explore Instead of Expand
This, once again, is where your gut will tell you this strategy has some flaws. But again, this is about maxing statistical probability. Your first ground unit should be loaded onto a transport and sent to the nearest high efficiency city on another continent. This happens before you capture the vacant cities on your own island. This strategy also capitalizes on a flaw in the AI strategy that can be exploited. The AI will relentlessly focus on occupying all cities on its own islands before invading others. If you are playing against an AI opponent, ASL works even better because you will be set up to expand faster in the long run.
For the sake of understanding this, we assume you constructed a Transport and Armor on steps 2 and 3 respectively. You should be at or around Turn 54 when your first Armor is available.
Load the Armor on the Transport and immediately send it towards the closest continent with a city at efficiency 90% or higher. Don’t just send it to the closest city! You need a city with an efficiency of 90% or better to continue offensive actions on that island without offloading more troops in the future.
Most continents will be greater than 12 tiles from your home base. That will take a Transport 12 turns (6 turn to, 6 turns back) to make one cycle. During this time, Step 5 will have happened in parallel.
Step 5: Capture a Local City
With your transport well on its way to another island, your ground units will start receiving production bonuses. If you are building Armor, you now produce them in 10 turns instead of 12.
Use any ground forces constructed while your transport was en route to capture the remaining cities on your island. You can build whatever you want with these, but it’s generally a good idea to supplement your future efforts at expanding abroad. Here are my top five general recommendations, although this depends on efficiency and location of your next objectives.
I’ve removed all obviously bad options at this point in the game.
- Infantry. Too many infantry producing cities will cause your drain to max out fast.
- Armor. Build this if you intend to use your third city for Transport, or if other islands are fairly spread out.
- Fighter. Useful choice if you encountered your opponent’s unit by turn 60.
- Bomber. Build in your third city if you chose Transport in your second city. If you don’t, your expansion will soon outpace your exploration.
- Patrol Boat. If your continents are clumped close together, then do this.
- Transport. As travel distances increase, you will need more of them to keep pace. Select these as either your second city or third city construction option.
- Destroyer. At this stage they aren’t useful unless you are playing an older version of the game in which case these are the best sea exploration option.
- Submarine. A good choice if you have wide seas and air rage isn’t giving you good expansion options.
To be clear, this only refers to production options for the second and third city on your home island. If you are wondering what to make on your expansion islands, let’s go to step 6.
Step 6: Rinse and Repeat
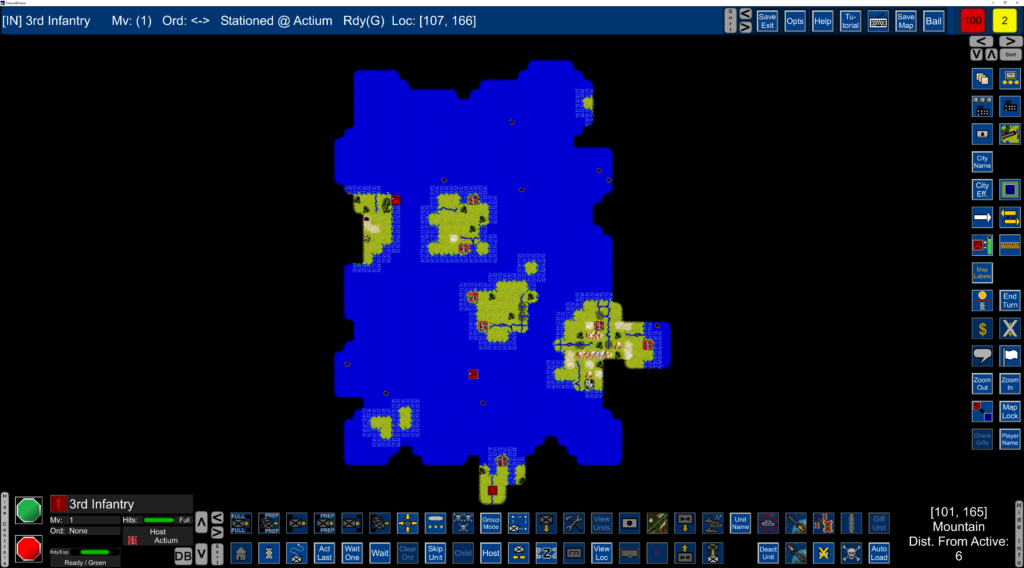
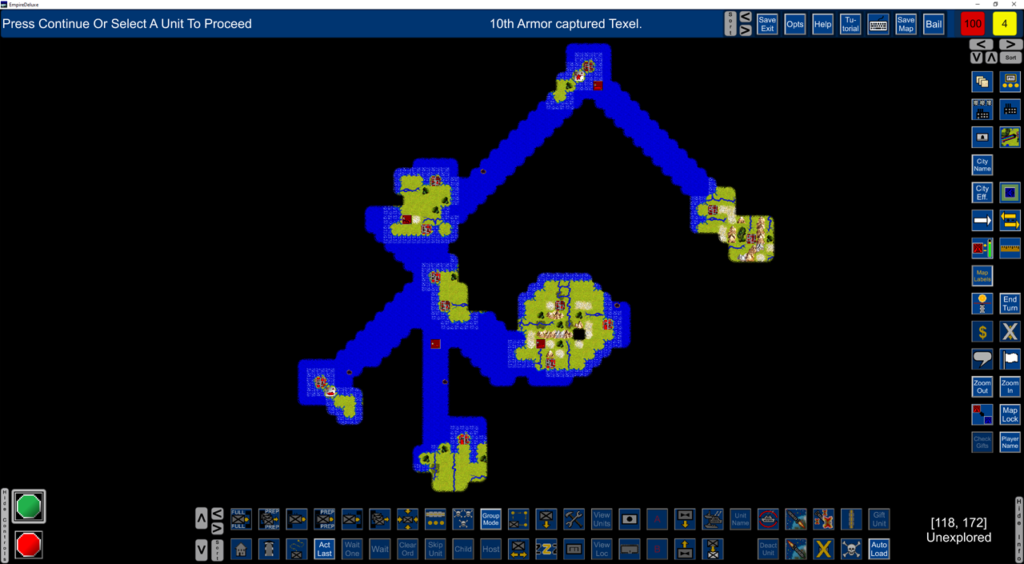
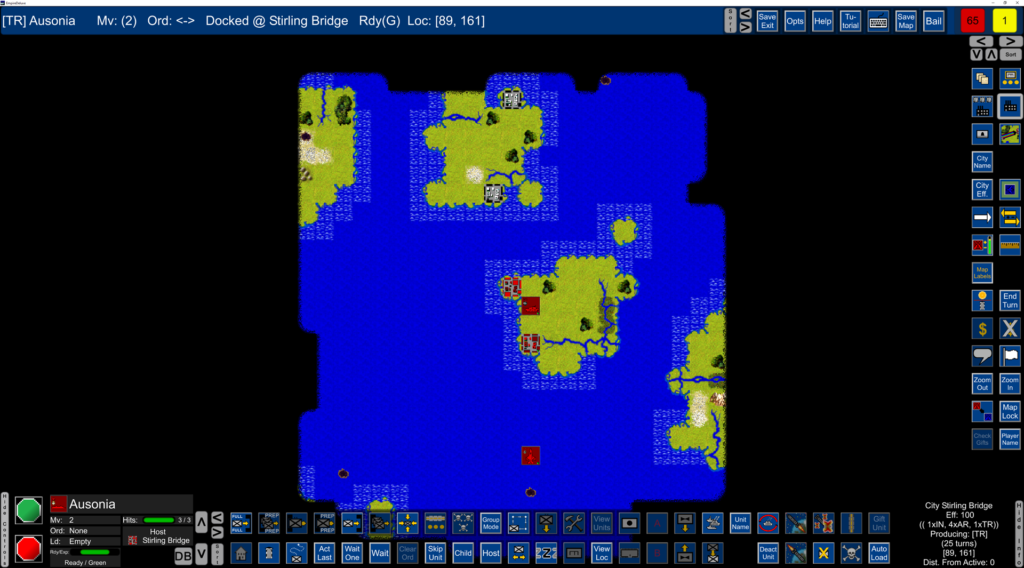
You are now 78 turns in. You have 22 more turns before you hit turn 100. Your transport has returned to your home island, you have captured at least one more city on your home island, and production bonuses on everything you construct are now kicking in. Moreover, you have constructed your first new unit on a second island.
By the end of 100 turns, your territory will look something like this.
Concluding Thoughts
ASL Doctrine is statistically one of the most consistent early start strategies in Empire. Most players can capture at least 5 cities by turn 100, with 10 a real possibility. However, this is pretty much at the statistical maximum for this strategy with almost everything going right for the player, but also demonstrates why ASL performs well in statistical analysis.
So what is a realistic expectation? Let’s assume you are comfortable with the strategy and recognize the areas of opportunity. By turn 100, you should be able to get a presence on three islands on a consistent basis. You should be able to minimize your CCR per turn to 1:15 (minimum of 6 cities captured in 100 turns). Lastly, you should be set up to have a strong expansion period for the next 200 turns.
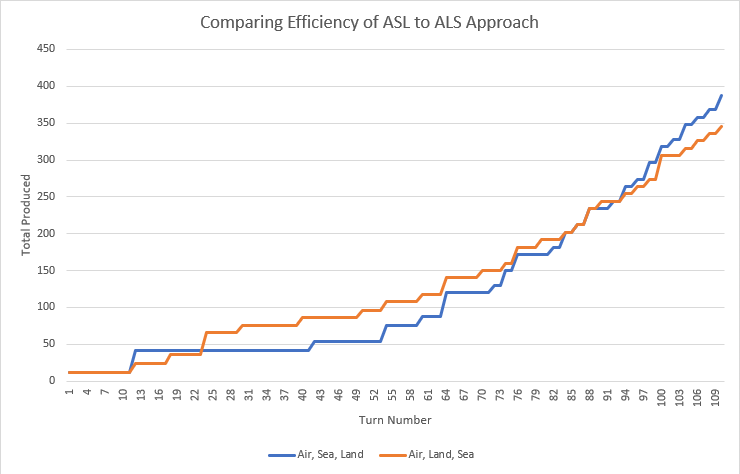
A typical play through will accomplish a CCR of at least 10 cities in 100 turns (1:10). This bottom deviation improves by 15% (1:12) and exponentially increases as you expand. Those are pretty good odds, especially since there are very few outside factors impacting you ability to achieve that number. Moreover, most players opt for the ALS approach, which by turn 100 your approach will start outperforming them.
If you know you will be spending the first 100 turns expanding and doing little else, this is a good strategy to use. Your ability to have presence on 3+ islands within 100 turns means you are less vulnerable to a sneak attack, gives you more flexibility in your next steps, and avoids incorrect assumptions from impacting your overall performance.
Hail Mary Doctrine
- Difficulty – Hard. I only recommend this to veterans, especially in multi-player.
- Speed – Fast. The fastest method available in the first 100 turns. There is no equal.
- Risk/Luck – High. The risk in this approach is stupid high. Be warned.
The Hail Mary Doctrine is the hardest, most difficult, and insanely risky strategy out there. I rarely ever recommend this strategy. And yet, it is hands down the most common strategy used in tournament play and is the primary strategy used by veterans. Even if you don’t use it, you will experience it being used against you. As a result, you should understand it and know how to beat it.
The reason for this strategy’s popularity is because it is statistically the fastest opening move. Tournament maps are known to the players in advance, or are randomly generated symmetrical, so with sufficient prep work and understanding of game mechanics, you can eliminate the risks involved. Essentially this strategy moves the exploration component of play beyond the first 100 turns, and focuses solely on expansion during the first part of the game.
Order of Operations
Here are the steps for this strategy in brief:
- Turn 0: Optional Infantry at start (not included in timeline below)
- Turn 1: Construct a Transport
- Turn 30: Construct Armor
- Turn 42: Load your first Armor on the Transport and head to the nearest island.
- Turn 52: Use next Armor to capture local cities
- Turn 62: Repeat step 3 and 4 until all nearby islands are captured.
Step 0: Build Infantry (Optional):
This doctrine has an optional step that says you can open the game by building a number of Infantry equal to the number of cities on your starting island. This is not covered in this guide because it is dependent on map setup. Most players will opt to include this step in the buy points phase of game creation, and therefore it isn’t a component of this guide.
Step 1: Construct a Transport
The doctrine states the first item to construct is a transport:
- Trucks. Not required in this doctrine. You will be focusing on faster units.
- Air Transport. Build only if your starting city is landlocked. Otherwise, it is too expensive for this stage of the game.
- Helicopters. These are not your best option this early in the game. Limits your ground approach to only Infantry.
- Patrol Boat. This doctrine bypasses these boats in almost all cases.
- Transport. This is your go-to option unless your starting city is landlocked.
- Carrier. This doctrine only uses them in late game. Pass.
This transport is the vehicle you will be using for the first 60 turns of the game. It is a rare case where a Helicopter is of value since speed is key. However, in most cases you should be building a Transport. As soon as your unit is built, send it on a Recon Cycle with an RP of no more than 6. Ideally, you should be using a DFS pattern, but it doesn’t really matter. You aren’t likely to discover anything since most map generators require an RP of at least 12.
Step 2: Construct Land Forces
The ASL Doctrine says your second step is to select the type of ground force you will be using on your expeditions. This is a long-term choice, so choose wisely and expect to leave it that way for the next 60 – 100 turns.
- Infantry. This strategy relies on a CSP > 70%. Only build Infantry if you are going the Helicopter route in Step 1.
- Armor. The Hail Mary is based fully around Armor’s CSP of 75%. It’s the right tool of choice.
- Light Artillery. No offensive capability
- Heavy Artillery. No offensive capability
- Anti Air Battery. No offensive capability
- Trucks. No offensive capability
- Engineer. You will be building Armor almost exclusively. You only need these if you are building Helicopters and have a lot of terrain obstacles.
The Hail Mary Doctrine gets its name from this step. You are going to completely bypass the exploration phase of the early game. Instead, you are going to capitalize on Armor‘s excellent 75% CSP rating. You can also use Infantry, but these are far more risky in this strategy because of its CSP 50%. A general rule of thumb anytime you are in doubt, your success with the Hail Mary is based on your CSP.
Step 3: Expand to Another Island
Like the ASL Doctrine, the Hail Mary says you should load your first Armor to a Transport and explore. If you found a land mass in your Step 2 search, go there. Otherwise, you should sent your Transport along the DSL path. This is done before you conquer the other city on your starting island.
Now for the theory behind the madness. The statistical concept of the Central Limit Theorem provides that the probability of uncovering a landmass is the same for a transport as it a fighter every time you reveal a tile. As the game progresses, only the number of squares you reveal per turn increases the probability of finding another island each turn. Thus, a Fighter on a standard DFS pattern reveals a maximum of 81 tiles every 3 turns (27 per turn). A Transport reveals a maximum of 10 tiles per turn. The difference between the two is 17 per turn, and since a Fighter costs 12 turns to make, it means the Transport is a faster explorer than a Fighter for the first 120 tiles revealed. If your landmass ratio on game setup was the standard 30%, that means your transport has a 7% chance of finding a landmass in that timeframe, and matches the same probability for a Fighter five turns later. The difference is your Transport has a ground force on it, rather than the Fighter having to call the transport to the location it discovered, meaning you expand faster using the Hail Mary approach.
Didn’t follow that logic? Don’t worry, I didn’t either until I used it. And I mean I used it a lot. It basically says that Fighters only feel like they are better explorers because they reveal tiles faster. But in reality, early game is about expansion not exploration, and for that you need an explorer that can carry units. In other words, a Transport.
Step 4: Conquer Your Island
With your transport well on its way to another island, your ground units will start receiving production bonuses. If you are building Armor, you now produce them in 10 turns instead of 12.
Use any ground forces constructed while your transport was en route to capture the remaining cities on your island. You can build whatever you want with these, but it’s generally a good idea to supplement your future efforts at expanding abroad. Here are my top four general recommendations, with the rest in red, although this depends on efficiency and location of your next objectives.
- Infantry. Too many infantry producing cities will cause your drain to max out fast.
- Armor. Build this if you intend to use your third city for Transport, or if other islands are fairly spread out.
- Fighter. Exploration units will slow down your overall productivity. These don’t have the range necessary to be good options anyway.
- Bomber. Build bombers if you are having trouble locating other islands, or if your other cities are far away from your main producer.
- Patrol Boat. If your continents are clumped close together, then do this.
- Transport. As travel distances increase, you will need more of them to keep pace. Select these as either your second city or third city construction option.
- Destroyer. At this stage they aren’t
useful unless you are playing an older version of the game in which case these are the best sea exploration option. - Submarine. A good choice if you have wide seas and air range isn’t giving you good expansion options.
To be clear, this only refers to production options for the second and third city on your home island. If you are wondering what to make on your expansion islands, let’s go to step 5.
Step 5: Rinse and Repeat
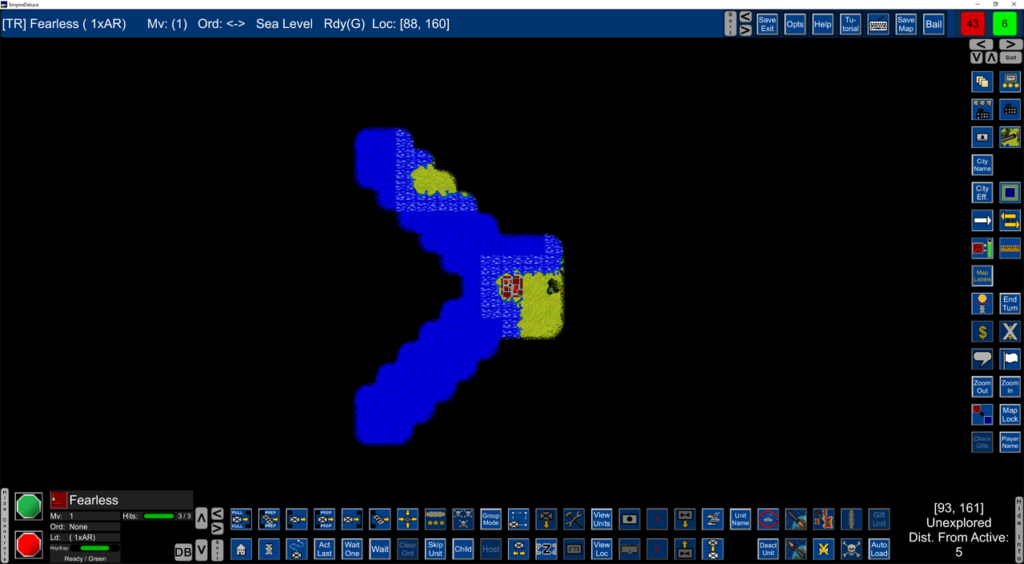
You are now 62 turns in. Even if you hit some snags, you are roughly 10 to 15 turns ahead of your opponents in expansion. Any islands your capture should be producing ground units until the island is fully under your control. Depending on the distance from your main producer, and the number of transporters on the board, move any excess produced units to those transports and repeat Steps 2 through 4 as though this island was your new home island. If you do it right, your expansion will resemble a web rather than the tradition blanket of revealed sea tiles.
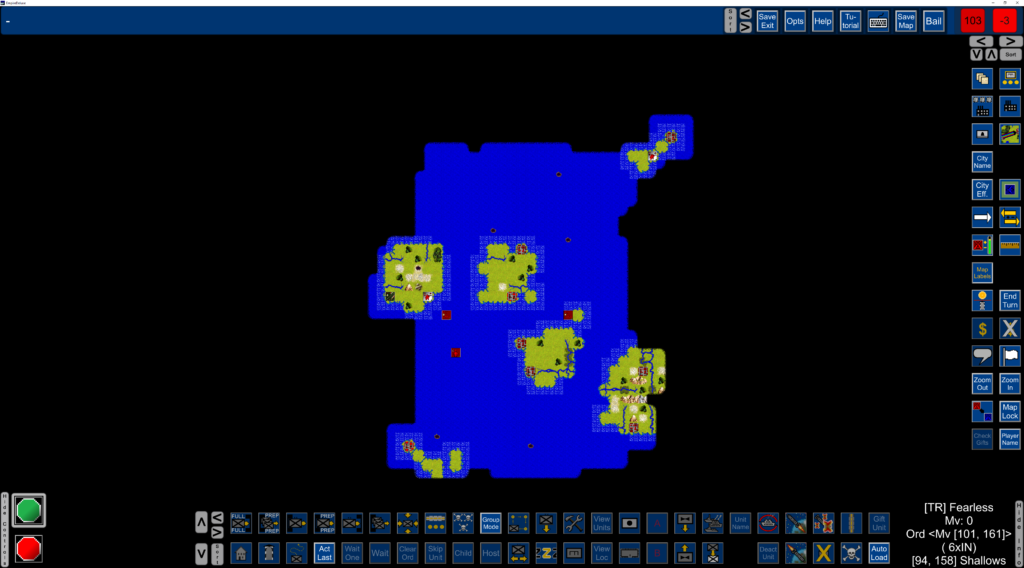
A Hail Mary campaign at Turn 100. Notice the hub and spoke layout of exploration, and the amount of distance covered in 100 turns. Its typical to see players using Hail Mary have 10% to 20% more cities than other strategies at Turn 100.
Concluding Thoughts
Hail Mary Doctrine is extremely risky in practice. On paper, the statistics show it as the best overall option, however it doesn’t account for the range x2 of recon units which means you are less likely to miss a continent by one single tile. In fact, if Transports had a recon range of 2, the Hail Mary would be hands down the best strategy in the game with no equal.
However, like I said in the introduction, this is the most common strategy used in tournament play. Along with the statistical boost it gives, a 10 to 15 turn boost over other players is a big difference, maps are typically shared at a high level prior to the start of the tournament. This reduces some of the risk involved in blind exploration with Transports, since you generally know if you missed something important. Another reason is that once you figure out the math, it makes sense when using it.
Even if you never intend to use this strategy, it’s important to learn when a player is using it against you. As the screenshots show, there are large gaps in recon coverage which you can exploit. Moreover, the lack of aircraft cover can give you an advantage in the right circumstances. Also, most players using other strategies will be victims of a spot landing by the Hail Mary Doctrine, and many junior players will resign outright thinking they were flanked, when in reality they held the stronger position.
Infantry First
- Difficulty – Low. You are building the essentials, but crippling your long game.
- Speed – Slow. Paint dries faster than this approach.
- Risk/Luck – Medium. You get exactly what you expect, and your expectations should be very low and straight forward with this one.
The Infantry First Doctrine is usually the first one every player learns when trying to understand the fundamental strategy behind Empire. In this approach, you build everything you need to conquer the world before you set out to conquer the world. In a fully random map, this strategy is risky but is a lot more stable if you know what to expect.
Order of Operations
Here are the steps for this strategy in brief:
- Turn 1: Construct 3 x Infantry
- Turn 18: Construct a Fighter
- Turn 30: Construct Transport
- Turn 60: Construct Infantry
- Turn 96: Repeat step 3 and 4 if you have >6 infantry waiting in your city.
Step 1: Construct Land Forces
Despite the title, there are choices other than infantry which work in this strategy. However, infantry remains best suited for this task.
- Infantry. This strategy depends on low cost units swarming the map quickly. These are the best option you have.
- Armor. A decent second option. Not really suited for swarming though, which is why they aren’t the primary choice.
- Light Artillery. No offensive capability
- Heavy Artillery. No offensive capability
- Anti Air Battery. No offensive capability
- Trucks. No offensive capability
- Engineer. Their 50% probability of remaining at full strength on city capture can cut down your long-term build cycle. Plus they construct things during downtime.
The first one hundred turns are going to see ground forces blindly opening up the fog of war. The more units you have the faster this goes. As a result, you are really going for cheap vs. effective units. Assuming there are two cities on your island, you will need to construct at least three Infantry before the CCR is in your favor (75% odds). That means it will generally require three Infantry per city.
Any cities you capture will produce Infantry as well, so you can make up any losses you take before your first transport is built. You are aiming to have a fully loaded transport as soon as it is built. Always remember, with this strategy it’s about always having the right number of Infantry units exactly where and when you need them, thus reducing wasteful spending on other unit types.
This strategy is about maximizing your early game UTR score. To this effect, you will be ahead of other players for the first 50 or so turns. For example, at Turn 24 you will have 36 points scored (150% efficiency!), This means you will look amazing on a leader board for the first stage of the game.
However, once you start moving towards other islands, your comparable score will start to drop immediately. Most players find a UTR of around 60% by mid-game, depending on how lucky you were with the random number generator. But more on that in Step 2.
Step 2: Construct Exploration Vehicle
Once you have explored your entire island, it’s time to move on to better things. Your infantry are still potent but you need to get them to a new area quickly. For that you need scout.
- Fighter. The only option that can explore the entire area in 30 turns.
- Bomber. Too slow, and close areas are already explored.
- Helicopter. Too expensive at this stage in the game.
- Air Transport. A super risky choice, but you will capitalize on anything you find.
You will have around 30 turns to find a nearby island that is worth conquering. This is one of the rare cases where Fighters are better explorers than Bombers, because their Recon Pacing does not exceed the build time for a Transport. I recommend DFS Patterning for this strategy but it isn’t critical to success. You should have a 5 turn buffer if you decide to deviate or use the standard “Explore” algorithm.
I will talk about Air Transports in the next section. You will notice at this time that you have a bunch of Infantry idling until you have something for them to do. Ideally, you are aiming for 6 to 8 of these standing by.
At Turn 30, your map will look something like this:
One more thing to note. Until your Fighter gets out there, you are dead in the water. If you don’t locate another landmass in range, you will have the divert to a Hail Mary or build a sea explorer. If you take this path, know that you are probably going to lose the game, as a 20+ turn delay will put you behind every other strategy, even ALS.
Step 3: Construct Transportation Vehicle
As soon as you have a fighter, you need a transport unit. If you built infantry in Step 1, used your second city to produce Infantry, and built a Fighter in Step 2, then you have some good options:
- Trucks. Worthless as they can’t go across sea tiles.
- Air Transport. If you built this in step two, you will need another one, so build it while you still get the production bonus.
- Helicopters. Terrain limitations make these risky options.
- Patrol Boat. You won’t be able to tell at this stage if you can use these effectively. If you are repeating this step, they are a possibility.
- Transport. The only one guaranteed to carry your entire army at this stage of the game.
- Carrier. You can’t use these for transport at this stage of the game.
Transports are the tried and true method. They fit with the Recon Pacing of Fighters and are the most consistent way to move a lot of Infantry at once. Once they are built, you will full load all your Infantry on it and begin an Island Hopping campaign. As a general rule of thumb, you will want to return to your island every 30 turns, or start your return journey for every third infantry built.
In the event you built an Air Transport on Step 2, then you have no choice but to build another one in Step 3. The reason is because of volume of production. Continuing to produce Infantry will cause your drain to plummet. An Air Transport has a long Pathing Cycle and only carries 2 Infantry. If your cities are both at 100% efficiency, that means you have to make a return trip every 6 turns, limiting your Recon Spectrum to 100, one third of a Fighter‘s Recon Spectrum. You can only break this barrier by building two.
If you find your transport without an acceptable city on turn 30 of your Pathing Cycle, start the return home and dump all the infantry on a convenient spot on the way. This way you can use the same transport to grab them in the future and still pick up a full load once you return home.
Step 4: Construct Infantry
Once you have your first Transport, somewhere around turn 60, it’s time to switch production for the long haul. You should average a full transport load every 30 turns at this point, which means your transports effective range is 30 tiles in any direction. When you start expanding close to this threshold, you will need to construct more transports. As a general rule of thumb, if your total idle Infantry exceeds 8 in one city, you need another transport. This is the threshold where your Infantry will start outproducing your ability to move them.
Until then, your objective is to get Infantry on foreign islands as quickly as possible. The best method is to use Island Hopping or Continental Crush. Because it took 60 turns to start your expansion, you are extremely limited on time. Employing the right strategy at each amphibious landing is going to be critical to turning this into a success. If you are going to use Island Hopping in mid-game, drop two Infantry per island. If you go Continental Crush, unload 3 Infantry per island if under 12 tiles from your home city, and all of them if you are beyond 12 tiles.
Step 5: Self-Sufficient Expansion
By the time you capture your second island, your total UTR will be around 100% and your PMS score is around 80%. This is respectable given the amount of production you’ve done, but the devil is in the details. You will constantly be in a battle against your drain score, your transport networks will start thinning out as you expand farther, and your will always be right at the edge of your exploration zones.
If you are still relying on your home city to produce Infantry, be careful to avoid having more than 6 infantry sitting idle (max of 8). If this happens, your expansion is stalling and your drain will sink quickly. You need to keep a careful eye on this because your Transport(s) will usually start traveling beyond a 30 point Pathing Cycle threshold by Turn 100. Moreover, you will be at the threshold of your Recon Spectrum, meaning your next area of expansion is mostly guesswork. If you find yourself in this position, use the tile ID’s to determine if you should travel generally north or south. A high ID number means you are at the bottom or right of the map, where smaller ID’s mean top and left respectively.
If you ever have 9 Infantry in your city, you have hit a point of no return where your land production has outpaced your ability to transport units. You need to construct some cheap Transport options quickly. If you find yourself in this position, return to Step 3 and start over. Hopefully you hit this problem after the 100 turn limit, but if you hit it before turn 100 it means you are probably significantly behind your opponent.
On a final note, at around Turn 85 you will need to set one of your new islands to follow Step 2. This is best done on a single city island or one you have fully explored. As the screenshot showed above, your lone Fighter will no longer be adequate by Turn 100. If you switch a city at turn 85 to produce a new exploration vehicle, you will be set to expand in that general area as soon as your Fighter hits its limit.
Concluding Thoughts
Infantry First Doctrine is a great strategy if your objective is maximizing your early game lead. However, there are risks that can produce serious setbacks to your mid and late game performance if you aren’t actively fixing it. For example, you need to have another exploration vehicle (Step 2) ready to go on exactly Turn 100 if you want to keep expanding. Second, you need to keep your drain penalties as low as possible. Third, you need to figure out what you are going to do with all the stranded units.
Most players complain that this strategy leaves their land advancement right on the edge of their explored area, effectively turning Infantry from conquerors into explorers. This is dangerously counter intuitive to this strategy if you ever reach this point. Every other early game strategy will outpace you if you are forced to convert Infantry into explorers, as they can at best reveal 5 tiles per turn.
Another drawback is you have a lot of high value targets on the board. A fully loaded transport has a Target Value of 68 points, which is more than a Battleship. Losing just one Transport in early game will take you out of the game permanently. Especially as your transports head farther into unknown territory, this risk becomes higher and higher. In fact, IFD players are typically the first players to experience a decisive attack against them, and because their units are soft they typically lose this first engagement.
On the flip side, there are two important advantages in early game. First, if you are surprise attacked by a close enemy player, your stranded units will give you an edge. You will also be able to overpower any attack since you will constantly have fully loaded transports at sea, and thus better internal supply lines.
Second, you have the best UTR in the game. At one point, probably around Turn 40, you should have a UTR around 150% which will give you an early points advantage. This is probably the best anyone can achieve during the early stages of the game. It also sets you up for exponential growth in mid-game, as long as you can figure out how to deal with your limited exploration capabilities and keep drain relatively stable.
One final note. Always remember that constant potency is why UTR is a powerful metric. An idle Infantry unit produced at turn 11 is just as effective at capturing cities as an Infantry produced at turn 91. The hardest part of the strategy is getting the Infantry in the correct place to use that potency. That is why your success with this strategy will have more to do with the map than your ability as a tactician. In other words, it’s a very risky strategy.
For that reason, namely the reliance on pure luck, I usually recommend this for newer players but suggest you quickly move away from it. For experienced players, there are options that will let you capitalize on your improved skill and less on pure luck.
Anticipate 4X Doctrine
- Difficulty – Medium. Usually a second-class strategy. If you can master Infantry First, then is your next step up.
- Speed – Medium. Not the fastest, but it is adequate and the most common one used so you will be in the middle of the pack.
- Risk/Luck – Low. This is a by the book strategy and is fairly reliable.
The Anticipate 4X Doctrine is applying the traditional 4X strategy to EDCE. In case you are unfamiliar, your strategy will be to Explore, Expand, Exploit, Exterminate in that order. The key to this strategy is to know exactly when to transition between phases. It is also the only early game strategy where you will build attacking units with the intention of invading your enemy players before Turn 100.
This strategy assumes you have experienced the worst of EDCE, such as drain penalties, failed combat odds, limitations to exploration, and even challenges with transports. These are key factors to anticipating when to switch your strategy’s focus as well as why this strategy helps eliminate risks.
Order of Operations
Here are the steps for this strategy in brief:
- Turn 1: Construct Bomber (Explore)
- Turn 12: Construct 2 Armor (Expand)
- Turn 34: Construct a Transport (Exploit)
- Turn 62: Construct Defenses (Exterminate)
- Turn 74: Load Armor on the Transport and head to the nearest island.
- Turn 84: Repeat step 1 through 4 on every island.
Step 1: Build Exploration Vehicle
The first step of 4X is Exploration. For this, construct an aircraft for exploration:
- Fighter. Good option if your starting island looks large. Otherwise, skip this.
- Bomber. Best choice but you will have to manually move it for a few turns at least.
- Helicopter. Too expensive at this stage in the game.
- Air Transport. Better to build this in the Exploit phase than now.
- Destroyer. A typical option for an AI opponent, but not a good one really.
- Submarine. If you suspect islands are far away, and you don’t mind exploring with Armor, this can work out.
- Satellite. Causes you to sacrifice your early game completely, but you will be one step ahead in mid-game.
If this is your starting island, Fighters are the only unit you can set to auto explore as its Recon Cycle should reveal enough tiles by the time your Armor is ready. If you use Bombers, you need to fully explore your starting island before you can set it to early explore. That said, once your island is revealed a Bomber can be set to auto explore and not have to touch it again until late game.
If you are coming to this step from Step 5 below, you want to move up the chain as quickly as possible if this isn’t your starting island. Fighters are a better choice as their superior speed are important for quick expansion. Before you build this, verify that this island needs exploring. If it is already explored, Step 1 is optional. You can skip straight to Step 2 if you desire.
Step 2: Build Expansion Vehicle
The second step of 4X is Expansion. For this you need to construct a unit capable of conquering all the cities on your island.
- Infantry. Good choice if cities are within 4 tiles from your starting city.
- Armor. Most reliable option. Only deviate from this choice if you suspect an enemy is nearby.
- Light Artillery. No offensive capability
- Heavy Artillery. No offensive capability
- Anti Air Battery. No offensive capability
- Trucks. No offensive capability
- Engineer. It’s too early for this unit and it is too expensive to expand quickly.
You will be stuck on this step until one of two things happen:
- You can conquered all cities on the island.
- Your drain has hit a negative value and you need to do something different.
If this is your starting island, The 75% CSP of Armor is really your best option here. You will be building at least two Armor, because you won’t have conquered all the cities on your starting island by the time you have to construct the second one. You get a production bonus by building it now instead of after Step 3, and it’s probably the only time you will. So take it now. I would avoid Infantry on your starting island because the CSP is 50% at best and a successful capture doesn’t result in a unit that you can transport in Step 3.
One additional note, if you are able to take the second city without needing a second Armor, you might be tempted to immediately switch to Step 3 and produce a Transport. However, it’s advised that you don’t do this. You are already receiving a 2 turn production bonus on this second Armor, and you will have to undo any development already done. If the second city was two turns away, that means you pay 4 turns of development to start a Transport two turns earlier (net loss of 2 turns). This new loss only increases the farther away the city is from your starting city. Just let the second Armor finish before you switch production and go to Step 3.
If you are coming to this step from Step 5 below, Infantry or Engineers may be preferred, depending on the circumstances. You should always build Infantry if you suspect an enemy is nearby so you can inflict some attrition if needed. Engineers are great if there are supply points on the map. Always watch your drain though, and make sure you construct Armor or Engineers if you drain is below 3.
Step 3: Build Exploit Vehicle
The third step of 4X is Exploit. The doctrine describes this as “The player must send explorers into this fog [of war] to unveil the land to expand into, the resources to exploit, and the opponents to exterminate.” In this case, resources are cities. This step involves re-tagging your expansion vehicles from Step 2 as exploit vehicles and then constructing whatever is missing.
If you followed Step 2 and built two units, ideally you should have an Armor and an Infantry from the city you captured. This gives you an excellent 87% CSP, more than enough to conquer another island. What you need now is a Transport vehicle.
- Trucks. Worthless as they can’t go across sea tiles.
- Air Transport. Your CSP falls considerably with this option when using this strategy. Avoid it.
- Helicopters. Same issue as Air Transports, but your CSP will be half your potential, so its even worse.
- Patrol Boat. Same issue with Helicopters. At least there are no range issues.
- Transport. Hands down the best option here. 6 infantry (or 3 armor) means it won’t have to constantly return to refill once you get going.
- Carrier. Too expensive this early in the game, and has no immediate benefit over Transports.
If this is your starting island, you need a Transport. I know Air Transports will look interesting, but their limited transport capacity means the best you can do is CSP of 60%. The other options available don’t even break 50%. In order to exploit properly, you should be targeting a CSP of 65% or better.
If you came back to this from Step 5, Air Transports are a bit better but not by much. Chances are you are going to turn this new island into your next expansion point. You should have enough intel on your surrounding area to determine if the next jump is within a Pathing Cycle of 12. If it is, Air Transports are fine. If not, Transports are your only option, especially if the Pathing Cycle is greater than 18.
Another note is to watch for the signs that you have maximized this strategy. Ideally, you want your troops to invade the next island right when your Fighter hits the Recon Spectrum limit. You want your available ground forces to be at max right when your Transport is ready for another load. Finally, you want to keep your Drain right around 1 to 3, which means you are maximizing your build capacities.
No matter what, once your Transport is built you need to confirm that you have enough available CSP to exploit every island within your Recon Spectrum. A general rule of thumb is to try for a CSP of higher than 65% (two thirds odds) which will require at least 18 points of land units to be available, or minimally one Armor and one Infantry. If you do not have this then you are stuck on this step until you have built enough units. Use the building guide in Step 2 when deciding what to make. If you are going the Air Transport route, rank Infantry a bit higher, as they will be more versatile in some cases.
Step 4: Build Defensive Vehicles
The fourth and final step is Exterminate. By this step your exploration capabilities have moved beyond the range where you can effectively explore or exploit from this location. It is time to move on to defensive units. This include anything you might need to successfully assault and hold and enemy location. It may seem too early in the game to build these, but if you successfully reach this point within the first 100 turns the chances are high that you are going to be the one delivering a first strike against your opponent in mid-game.
You can largely rely on the unit listings in the Building Units section of this guide. Here is a quick list of options that you will likely consider at this stage where their value differs from the default values:
- Armor. Marginally useful, but it may take them too long to transport to the front lines.
- Light Artillery. If you suspect a surprise land invasion, build this. Not normally required on your starting island until late game.
- Heavy Artillery. The AI loves these things. I do not. If you set some patrols around your city they are more useful than Light Artillery.
- Anti-Air Artillery. exploration aircraft are likely to be the first targets you have to deal with. Very useful until you find your enemy’s direction.
- Fighter. You can quickly deploy them at any weak spots or where you spot enemies. Swarms of these harrassing transports can delay invasions.
- Helicopter. Quickly move land units. However, you’ll have to verify your other cities are in range before you built these.
- Destroyer. The AI loves these things. Subs are better.
- Submarine. Can act as both an explorer and an offensive unit. Good overall choice.
- Cruiser. Too expensive for early game. Only go this route if you have a high production city.
- Seabee. Most RNG maps are 90% water, river, or clear. This unit can go practically everywhere.
Realistically, your home island is going to be the only place that will switch to defensive vehicles by Turn 100. Your objective at this stage is to shore up your defenses in case you are invaded by some kind of expeditionary force. At the same time, you want to prepare your forces to deal with intrusions elsewhere. Fighters are great for this, as you can deploy them quickly. Their presence is sometimes all that is needed to prevent an invasion from another player. It can also cause your opponent to take a more cautious path, even when you are in an inferior position.
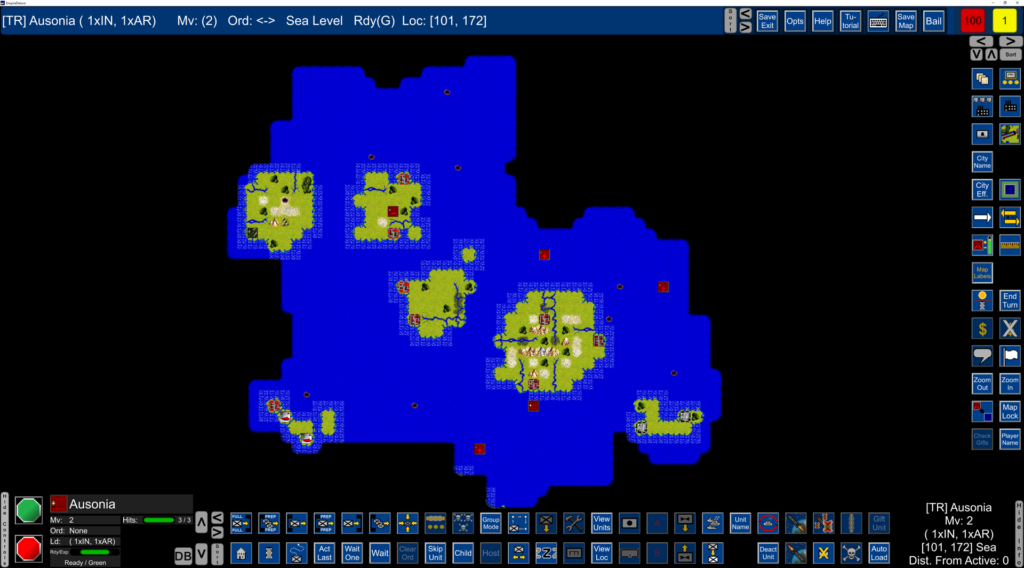
Step 5: Rinse and Repeat
By the end of Turn 100, you should slowly start to notice a pattern. On a normal, randomly generated map, this will look like a wheel that is series of concentric circles that expand outwards. Each one of these represents one of the four principles of 4X.
Knowing when it is time to switch one of your circles to the next rung on the 4X model, you need to understand the conditions that trigger each one.
- Exploration – If the island in this chain is not fully explored, or you have not uncovered 2 standard deviations of explorable area around the main city, you are in exploration mode.
- Expand – If you have unconquered cities on this island, your drain is above zero, and your island is explored then you are in expand mode.
- Exploit – If you have cities on other islands that are not captured, or do not have enough units on an island to give 65% CSP, you are in exploit mode.
- Exterminate – If every island in the first ring beyond this island is fully explored with all cities captured, and your drain is not negative, then you are in exterminate mode.
Know that every island has it’s own concentric circles, they are not only from your starting city. As your circle expands to farther out from your starting point, you will want to diversify your unit types. Bombers are important when you find enemy cities and Cruisers are an inevitable need for any naval activity in enemy water. However, this is usually a Turn 150 move or later and is beyond the scope of this section.
Conclusion
If you follow the doctrine to the letter, your map should look something like this at Turn 100.
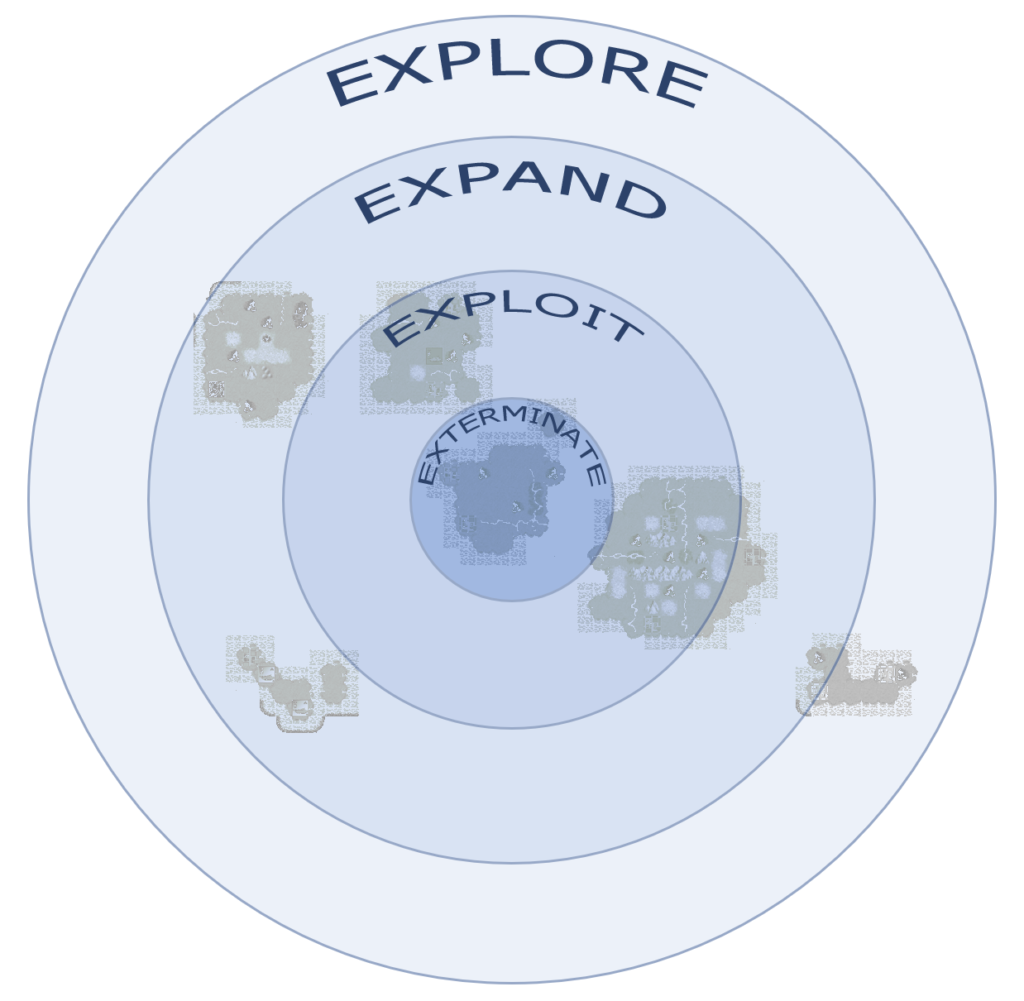
If you couldn’t see any significant difference between this one and the ASL approach, you are right. They are pretty similar in outcome by Turn 100. The difference is ASL is a probability based approach while Anticipate 4X is a method based approach. If you are an experience player, it probably doesn’t matter which one you take.
However, if you are new to EDCE, or Empire Deluxe in general, 4X runs a serious risk of becoming a complex ALS approach in that your growth will take a very linear path. For example, this strategy has the lowest UTR of all the options in this guide. The constant switching between unit types means a 12 turn or greater delay each time you make a mistake. The only way to remain competitive with the more statistical approaches is to learn how to anticipate the upcoming changes in your strategy before they actually happen, hence the name. A good player who uses this strategy can typically see a strategic switch 15 to 20 turns before it happens.
Air, Land, Sea Doctrine
- Difficulty – Medium. Usually a second-class strategy. If you can master Infantry First, then is your next step up.
- Speed – Slow. Not the fastest, but it is adequate and the most common one used so you will be in the middle of the pack.
- Risk/Luck – Low. This is a by the book strategy and is fairly reliable.
I won’t be going over all the details of Air, Land, Sea (ALS) because it is a combination of the Anticipate 4X strategy and ASL Doctrine. However, it is heavily used by the AI in EDCE which is why it needs mention. I’ve seen many players default back to this strategy, either because they learned by watching the AI or they fumbled somewhere in the 4X doctrine. I don’t recommend this as a standard strategy for human players. It performs well in early game but it performs poorly in mid-game, often causing players in good positions to take brutal losses, especially during tournament play. Moreover, it has very little room to switch tactics, further limiting your capabilities as a player.
Order of Operations
Here are the steps for this strategy in brief:
- Turn 1: Build a Fighter
- Turn 12: Construct 2x Infantry
- Turn 24: Construct a Transport
- Turn 52: Construct Infantry or Armor
- Turn 64: Load Armor on the Transport and head to the nearest island.
- Turn 76: Repeat step 1 through 4 on every island.
I will be generalizing these steps and focusing on recognizing when they are being used against you, rather than how to us it.
Step 1: Explore Your Island
The first step of this doctrine is to build a Fighter. It’s first priority is to fully explore your starting island, making note of any cities you find. As soon as the Fighter is built, produce two Infantry units and set them to conquer cities in sight.
In this strategy, Infantry play a dual role. If they have a path to a city to attack, they are designated to a “conquer” role. If there are no cities to attack, they are designated as “land explorers.” This designation isn’t important at this point, but as you hit the limit of your exploration capacity this designation will make a difference.
Step 2: Built a Transport Vehicle
In most cases, this will be a Transport. During this step, you will send your Fighter to start exploring nearby sea tiles. Once a city has been located (note, not another island, but only when a city is spotted) the Transport is immediately sent with any Infantry designated in conquer roles. The reason for not sending the Transport out to explore is to capitalize on valued targets. If the Transport had been sailing in the opposite direction when the Fighter uncovered a city, it would have delayed the attack by several turns.
In the grand scheme of things, I think this logic is overkill. If you were following DFS methodology, at most this should have cost you 3 turns delay. This is a small price to pay for the potential of having a Transport with two to three Infantry finding an opportunity to expand quicker. Moreover, this doctrine states that you should not attack a city unless it has a reasonable efficiency, usually defined as higher than 80%. For example, if you find a city with an efficiency of 10%, this is not good enough to warrant sending a Transport to capture. In theory, this makes sense but it leaves holes in your defensive line. Moreover, in long games, the sooner you capture low production cities the faster you can get them to a reasonable efficiency level.
Step 3: Air, Then Land, Then Sea
After you have expanded to your next island, the cycle starts over. This is always done in the same order. If there are air units available nearby, they should be re-tagged as exploration vehicles and used to reveal the island. If this is not possible, the exploration role diverts to land explorers. Finally, if there is nothing more to explore, this doctrine reverts to sea exploration. This is usually done with Destroyers or PT Boats.
This cycle is only broken once a new city has been located. Then, it goes back to conquer mode and Infantry are transported to the new island to capture. This approach is actually a highlight of the strategy. If you look at the screenshot from the Infantry First section, notice that it required landing troops on an island with no cities. ALS, and even Anticipate 4X for that matter, actively avoid that from happening. In this case, the island would have been bypasses and expansion would go another way.
Conclusion
Like I said in the opening, this strategy offers fewer benefits than others which have more statistical relevance. By Turn 100, this strategy will produce something like this.
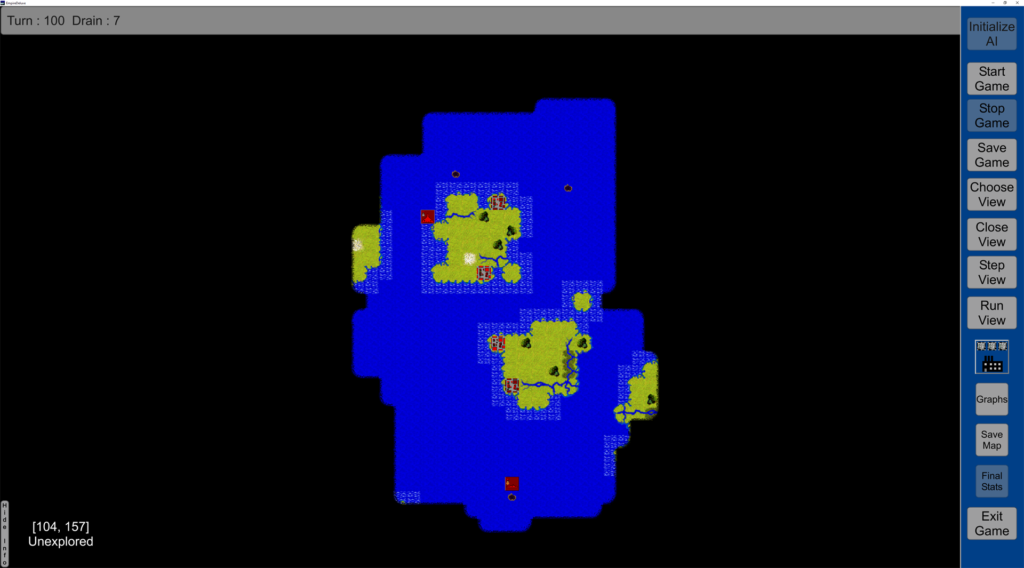
Don’t get me wrong, this is a respectable view for Turn 100. The problem is the strategy does not capitalize on the same statistical relevance as other strategies. By mid-game, players using this strategy will start to lag behind.
In other words, you are in an uphill battle to compete with other players. This strategy relies on an “if this then do that” mentality which is fine for an AI player. However, the point of early game is to set up your early exploration and exploitation model to provide an exponential growth position for the next game phase. ALS is too linear, and so is Anticipate 4X if you end up falling into the same traps.
Tactical Decision Making
[This section is a work in progress]
During gameplay, you will be faced with situational decisions. This guide will cover several of the most common encounters. It will show you how to identify when you are in one of these situations, how to properly implement it, and options to counter.
Here is the summary of strategies and their general effectiveness. I have colored them based on the importance of understanding them and your overall game performance. For information on how to approach it, find the header below where it is explained in detail.
- Continental Crush. Ensure rapid expansion through brute force. Best when you are crossing large land masses, but a poor option when you are in explore mode.
- DFS Patterning. The most effective search pattern and an essential strategy to manage effectively. Requires micromanagement to pull off correctly.
- Island Hopping. Ensure rapid expansion through exploratory invasion. Fastest method of expansion, but very vulnerable to counter attack.