Empire Deluxe Tournament 2020 – Game 2
 The second game of our Empire Deluxe Tournament 2020 is complete and it is a stalemate. This round had more set matches declared than Game One and more aggressive expansion during mid-game. It was the first play through where players used both the horizontal and vertical wrapping in their strategies with naval action taking center stage. This game also took longer to complete, spanning four days, before we ultimately called the winners.
As is tradition, we are using the Tournament Scoring rules outlined on the rule page of this website. Any set matches declared by a player will be shown in Black in the summary provided and any player-specific information will be shown in the color they chose during the initial setup.
Game One Draft
We have four players participating in the final championship this year. The draft order for Game One is determined by the number of points accumulated during qualifier matches throughout the year. Below are the starting locations and colors chosen by our participants for this game.
| Player Name | Empire Name | Location |
| Niefsa | Biju | Orbaal, North |
| Mara | Mirath | Mirath Islands, West |
| Holak | Melderyn | Melderyn, Southeast |
| Dalian | Athul | Athul, South |
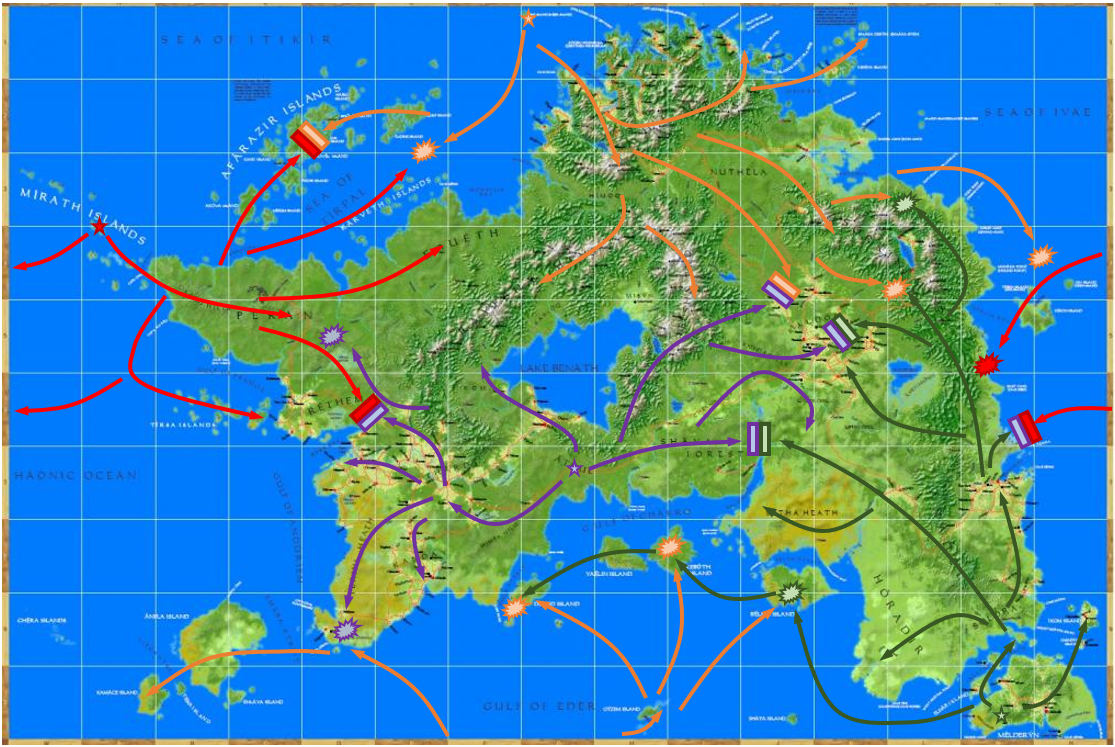
Order of Events Battle Map
Below is the battle map showing the order of major events. Stars indicate main locations and capitols. Lines indicate movement of major forces. Explosions indicate a major set match battle or a decisive victory with color representing the winner. Two parallel bars represents an inconclusive engagement, or an incomplete set match at end of game.
Moderator’s Game Summary
In our second game, players chose Mirath, Athul, Melderyn, and Bijo as starting locations. Athul would be the only one to start on the main continent while others elected to move to island starting locations. Perhaps the most surprising was Keiren’s move to Bijo, a small remote island north of Harn, after their highly successful start last game. This unique shift in starting locations emphasized the importance naval power will play on this map, as well as avoidance of the “barren” parts of the world where a lack of high efficiency cities means slower starts.
Our first major engagement started between Athul and Melderyn at the Battle of Ulfshafen. This was the second time that Ulfshafen became a major choke point and resulted in a stalemate between these two players that would define the battleground on this side of the map for the rest of the game. The battle itself concluded with a cease fire with Athul keeping control of the river and Melderyn fortifying the hills to the east.
Not long after was the Naval Battle of Tirpal. In comparison of things to come, this was a fairly minor naval skirmish between destroyer groups of Bijo and Mirath. Both sides lost their transport groups in the engagement, with control off the Sea of Tirpal ultimately falling to Bijo. However, this victory was inconsequential as it would take another month of in-game time before invasion forces could be re-assembled by Bijo and another offensive started.
During mid-game, all four sides found themselves fighting to a stalemate. Mirath captured the majority of the islands on the map but was unable to secure a strong position on the main continent. Its expansion towards Tenru Heath was completely halted at the Battle of Tharda where Athul armor and artillery divisions devastated the expeditionary forces. To make matters worse, the Invasion of Cape Renda was halted by Melderyn. While the invasion was unsuccessful, its fleet remained intact and Mirath would control the island chains to the east and west of the continent for the rest of the game.
Bijo then attempted the Invasion of Itikir. This led to heavy losses among its ground forces and caused an eventual withdrawal. The invasion achieved its primary objective though, preventing a potential sneak attack from the Afarezirs against Bijo, as they constructed a number of forward airbases and formed a blockade of the islands. This would effectively keep the islands from influencing the upcoming battle for the continent.
Additionally, Bijo conducted a massive campaign to the east and south, effectively replicating the same strategy that worked so well last game. This time, however, the chain of fortifications would be placed on a barrier from the Rayesha Mountains to the Anoth Delta. The strength of this line was tested by an advancing Athul force, but their inability to draw significant force to the northern side of Lake Benath meant this area of the map was left largely untouched by either side.
The majority of the mid-game conflicts were between Athul and Melderyn. Heavy fighting took place across Battle of Setha Heath, Second Battle of Ulfshafen, and the Battle of the Shava Forest with neither side able to gain an upper hand. Merlderyn attempted to outflank their opponent by winning the Battle of Belna and the Battle of the Gulf of Chakro. At the same time, Athul completed the Campaign of Kaldor which encircled the forces at Setha Heath and made their first Push to Horadir.
The final act of mid-game was the capture of the Rayesha Peak by Athul. An advanced engineering corps completed a highway from their capital to the peak, which they in turn fortified into an impregnable fortress. Their air forces built a zone of control that prevented Bijo and Mirath from advancing on this front, effectively closing it permanently to all invaders. IT also and ensured all future engagement would be Athul offensive engagements on the western site of the map with no hope of any counter attack.
In the late game, most fronts had become stalemates. Melderyn and finally met Bijo and fought two decisive battles at the Battle of Zerhun and Battle of Azadmere. The results left the region devastated and small skirmishes would continue until the game ends. More importantly, the battles in this area caused the Fleet of Kuza to flee the region and accidentally start the Battle of Garvin Bay, completely destroying the Mirath fleet heading home from the Battle of Cape Obeo.
Bijo caused further frustration for Melderyn with the Invasion of the Gulf of Ederyn. The attack would cause the Fall of Domir and Yaelin, although repelled by reserve forces from Melderyn at the Battle of Belna. This effectively ended Melderyn’s attempted encirclement of Athul and dashing their hope for victory.
Mirath also saw a series of setbacks. It was unable to break the Blockade of Afarezirs despite several attempts. This led to Bijo counter attacking with the Invasion of Cape Mefim which gave Bijo a beach head on Equeth and meant they could freely pour forces in from the Orbaal region. In the west, the Battle of Cape Obeo was a success, as Mirath would gain a beach head into Melderyn territory. However, as their fleet was returning home to collect reinforcements it was attacked by the large Fleet of Kuza and completely destroyed during the Battle of Garvin Bay. Melderyn, unaware of this, was unable to capitalize and re-take Obeo as its forces were fighting off the encirclement in the west.
Lastly, it was Athul who stole the show in the late game. It successfully encircled the entrenched forces in Setha Heath and took Burzyn. However, faced with large invasion forces in the north, it halted its advance and focused on retaining Kaldor. By the end game, Kaldor would be in ruins but still in Athul hands. They also defeated an invasion attempt but Bijo at the Battle of Cape Germal but would lose Kamace and Anfla in the process.
Conclusion
By the end of the game, only Bijo and Athul were left in strong positions. Mirath and Melderyn were in solid defensive positions but lacked the strength to regain their lost territories. The players convened and determined the next phase of the game would require hundreds of turns to build out enough forces for one to capture the other, and thus the game was called.
The winner of this match was a tie between Athul and Bijo.
The group agreed to one more round of battles between our four champions. This will not be completed until our final meeting on Tuesday, January 5th. So stay tuned.