Some Lessons Learned For Unity Sprites
As I indicated in my last post couple of posts, I decided to pass along a few of the lessons learned I’ve had from some recent artwork I made for a game using the Unity Engine. I’m specifically referring to the work I did with multi-layered road sprites and the 2 bit supply sprites. Both of these are for Empire Deluxe Combined Edition, but I assume it’s fairly universal since I can find posts about this issue for other Unity-based games.
If you want the TLDR, skip to the Conclusion at the bottom of this post.
Some Background Info
I’ll start with some history on this issue. For those interested in the early days of pixel tiles, 8-Bit Guy and Pocket Gamer do a good job of giving this overview. This was how I learned to do graphic design in the 90’s, and they cover it pretty well so I won’t repeat it here. At its heart, Empire Deluxe has it’s history born in this same era so it still uses many of these early concepts.
Unity and PNG Artwork
TLDR: Unity has to cover multiple ways of using PNG files in games using the engine, not just the commonly used methods.
I’ve seen an increasing use of PNG files in games since the introduction of this format. Prior to it’s popularity, your choices as a graphic designer were limited if you wanted to include transparency in your sprites. Pretty much every option requires use of an indexed format such as DDS, GIF, or BMP. For formats without defined alpha channels, you had to program the transparency by locking the pixel cells, usually programatically. When the PNG format was introduced, they came with an 8-bit alpha channel to designate transparency which effectively removed the benefits that other file formats used, and it still retained its artistic RGBA qualities. What all that means is, to an end user, PNG is effectively a JPG with transparency.
From a software developer’s perspective however, this created a whole new set of problems. First, most games started being 3D which meant GPU’s weren’t focusing on optimization of 2D graphics anymore. Secondly, it opened the world to some impressive design options, leaving budgets allocated heavily towards the design team and not towards the software team. And Third, if you were an engine designer you had to had to make sure your engine was foolproof to designers who might not have any coding experience at all.
Namely, it removed the usual artistic restrictions placed on designers at the time and opened a field to many who probably weren’t as qualified or trained in digital art. That’s a polite way of saying it made it possible for amateurs to create professional looking game art. Inversely, it means a game engine developer has to account for developers who are trying their hand at artwork but lacked the experience of the past. This in turn frustrated the legacy game designers who knew what they were doing, but now their tried and true methods weren’t working as expected.
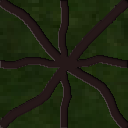
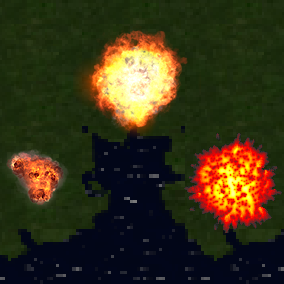
So that brings us to the main issue – the use of alpha channels on PNG files. Take a look at the two images posted below.
|
|
|


These are actually the same image, one with the alpha channel and the other with it removed. As you can see, it’s a black image with the alpha channel defining the artwork. To a layman, you might think this is a ridiculous way of doing it, but it’s actually genius if you consider all the factors involved from a designer and copyright perspective. It saves space and avoids watermarking by relying on the 8-bit alpha channel instead of also adding color information into the channel.
The file on the left which uses the alpha channel to define the image is a popular method of design for silhouettes and icons. However, this isn’t the only method of achieving what this file is doing. The more straight forward method of simply drawing the image in the RGBA channel is the obvious alternative. In either case though, the file leaves the program’s rendering engine, in this case your browser, to determine how the file should be displayed. In fact even your browser may handle the image differently. If the two images look identical to you, that’s your browser actively demonstrating the issue I’m explaining below!
Just like how your browser is interpreting the intended way the file should look, other programs have to do the same. The designers of the Unity Engine probably discussed this same issue in multiple internal planning sessions. And Unity, being built for game designers at all levels to use it, had to account for as many methods as possible for how people were likely to implement PNG images on their engine.
Explaining the EDCE Design Choice
Empire Deluxe uses a square tile map. In the 90’s this was a popular option. Isometric tiles is the one most are familiar with due to it’s ability to mimic 3D depth. Issues arise with this approach when you have have to dynamically match sprites against neighbors, where the neighbors are not always identical. Consider this screenshot from Transport Tycoon.
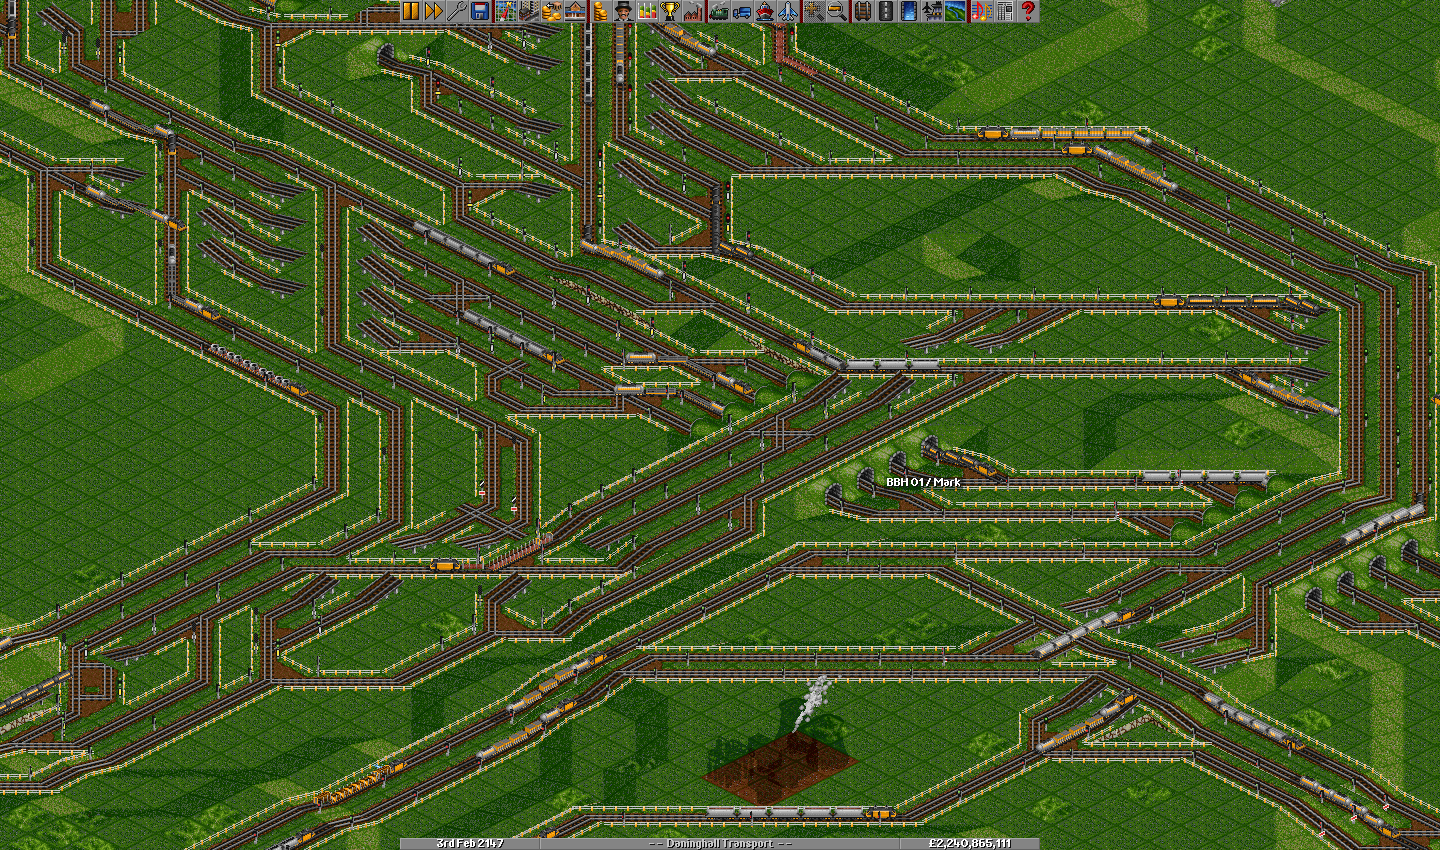
As you can see in this image, not all rail tiles have neighbors which are identical. Each rail tile may have a different connection to it’s neighbor (N,S,E,W, diagonals, etc.). Using old school methods, A graphic designer has to hand draw each tile and define any transparencies, overlaps, animations, and depth which can mean months of work mapping the tiles. The sprite map used to generate the rails in this shot includes over 300 sprite tiles that have to be drawn this way.
Contrast that to Empire Deluxe. Mark, the developer behind Empire Deluxe Combined Edition, created the same effect as Transport Tycoon using only 13 road sprites – 8 directional connections, a central connector, and 4 corners to supplement the diagonal connections. 8 sprites instead of over 300 from a graphic design standpoint is a huge reduction in the amount of art requirements, so it’s obvious why he chose this method. But like most things, reductions that drastic will have some significant limitations and trade-offs.
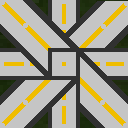
Here is a picture of the roads in action.
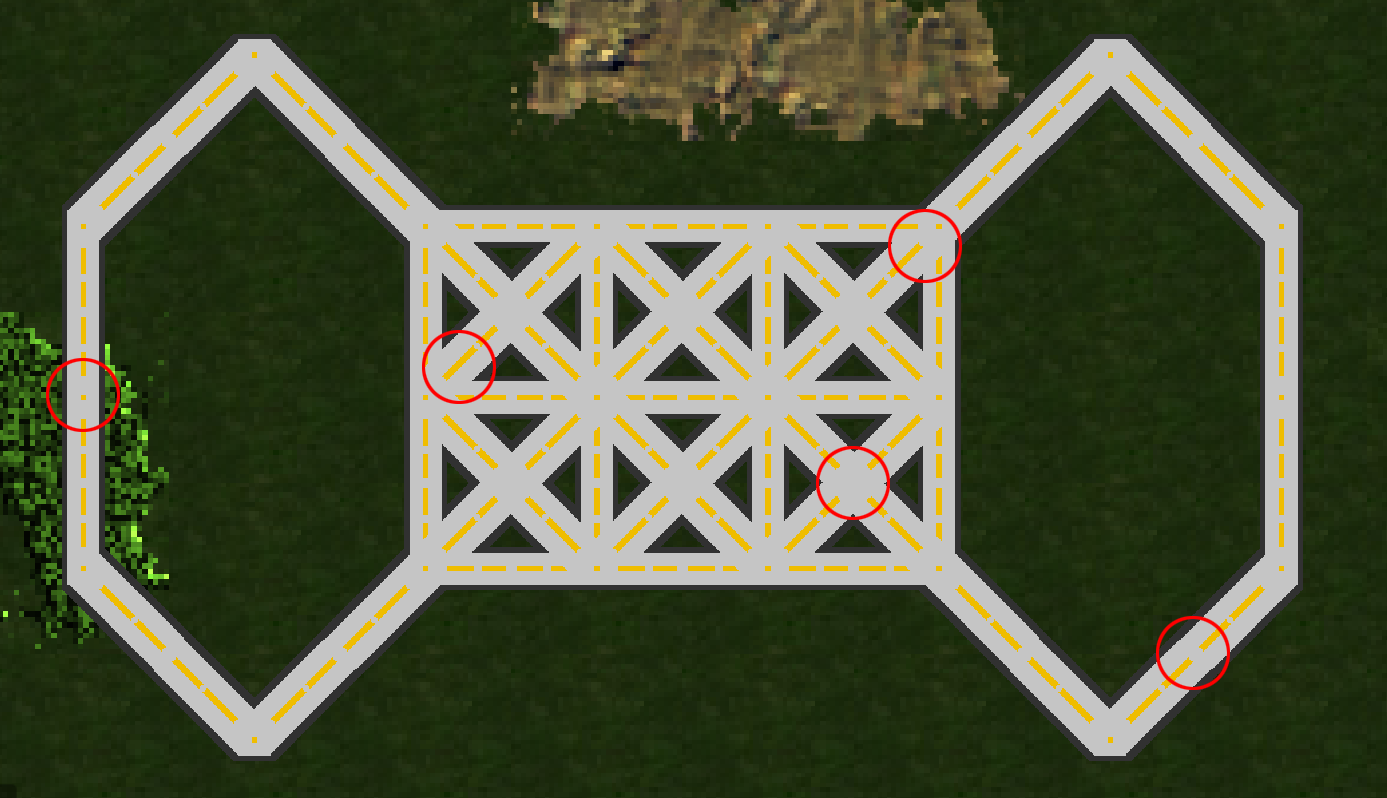
Empire Deluxe is using the PNG alpha channel to merge the images together to create a new image. At the center of each tile is a square with a yellow dot representing the center point. You can see it in the image I posted. Then, depending on the neighbors, the engine is rendering the connecting road tiles accordingly. If it’s a diagonal, it also adds additional tiles.
To the untrained eye, this works flawlessly. The glitches in road tiles in Empire Deluxe are hard to spot unless you zoom in all the way. This is due to Mark’s choice to limit colors to three – yellow, light gray, and dark gray. The contrast between the yellow and light gray is hard to see on nearly all zoom levels, and therefore note easy to spot. The dark gray borders don’t overlap. If the diagonal roads are noticeably fatter, the yellow lines are not consistent, and most damning of all the roads are all at sharp unrealistic angles.
He also made one other important design choice. He did not use gradients. The game engine is using the alpha channel of the PNG file to determine what pixels to render. Remember the two images I posted above? The default roads are using that same concept to work it’s magic in Empire Deluxe to determine where the boundaries are location.
In summary, this approach works the way the developer intended it. It’s a cheap and easy way to make roads connect properly. Programmatically, it’s the best approach for the job and it’s a great reminder of how sprites used to work back when I first started graphic design. But like the early days, this approach comes with limitations.
Limitation 1: Blending is a no-go
Here is a re-post of the image from February 5th. It demonstrates the heart of the problem I encountered.
I assure you, I’m better at my job than this image indicates. I did not in fact code green borders on that image. What you are seeing is the the Unity Engine using the alpha channel to try and determine how to handle overlapping on tiles. This isn’t an issue if your alpha channel operates at only 100% or 0% per pixel as it does in Mark’s file above. Here is a procedural way of understanding what is happening:
- Load the first image and map each pixel
- Is alpha > 0% on this pixel? If yes, draw this pixel
- Repeat for the entire sprite
- Load the next image and map each pixel
- Is alpha > 0% AND this pixel not already drawn? If yes, draw this pixel
- Repeat for the entire sprite.
When you use the alpha channel to lock pixels and render them, it prevents overlapping files from using that tile. In the image from February 5th, you can see I was applying a transparent bevel gradient along the edges of the road sprites. The road sprite that rendered first locked the tile to that sprite, forbidding the next road sprite from turning that tile from green to brown. The reason it is green is because that bevel did not include any color mapping and drew the transparency using the color from the background, in this case a green tile.
Let’s look at it another way
Let’s create a program that removes the ability of the alpha channel from locking the pixels and see what happens.
|
|
|
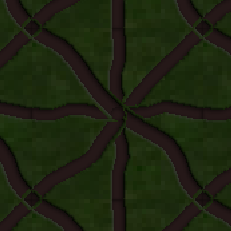
Both of these images used the same method to render. If you look at the image to the left, this is the same 13 road sprites from my February 5th post but rendered in a program that doesn’t lock the pixels based on the alpha channel. Instead it merges the alpha channel of all sprites by totaling the alpha value of each pixel and renders them in a post rendering process. In other words, pixels are locked and rendered only after values of all files are considered.
I then did the same thing for the original road tiles from Empire Deluxe. As you can see, this had a much different result, making the roads noticeably artifact heavy. If you look at that file, then back at the one above where I highlighted the graphic glitches, notice they are almost all where the dark gray lines (aka edges of the alpha channel) are located.
In short, it means Mark knew what he was doing when he addressed the drawing limitations of the 2D engine rendering these files. You can’t fault a developer for that. Quite frankly, it demonstrates how the engine didn’t like my “approach” and I will need to confirm to a different standard.
What was the fix?
In short, for every tile that potentially overlaps another you have to define the color and provide an alpha channel of either 0% or 100%. If you were dead set on addressing this, a studious designer would map out each pixel, determine their intersects, and get creative on the coloration at those intersects. There are 49 (48 + center which renders on every tile) intersects you need to consider that aren’t along the edges of the file. Then you have to modify your files accordingly Here’s a hint – gray tends to blend with almost anything if you tweak it long enough.
However, I took an easier approach. What I did to fix this is move the bevel effect onto the brown tiles which I had set at 0% transparency. I then had to tweak the colors a bit to make sure the pixels wouldn’t stand out too horribly on different zoom levels. This was the quickest, dirtiest fix and looks pixelated on close zoom levels and isn’t my best work. But as I said when I released the road tiles, they are used so infrequently I couldn’t justify the time spent fixing all the intersects.
Limitation 2: Lack of Variety
Does anyone remember what it was like to do Civ 3 road tiles? In case you forgot, here is an image of the 256 road tiles I created for a Civ mod a decade ago, and is doing the same thing Mark is doing in 13 sprites.
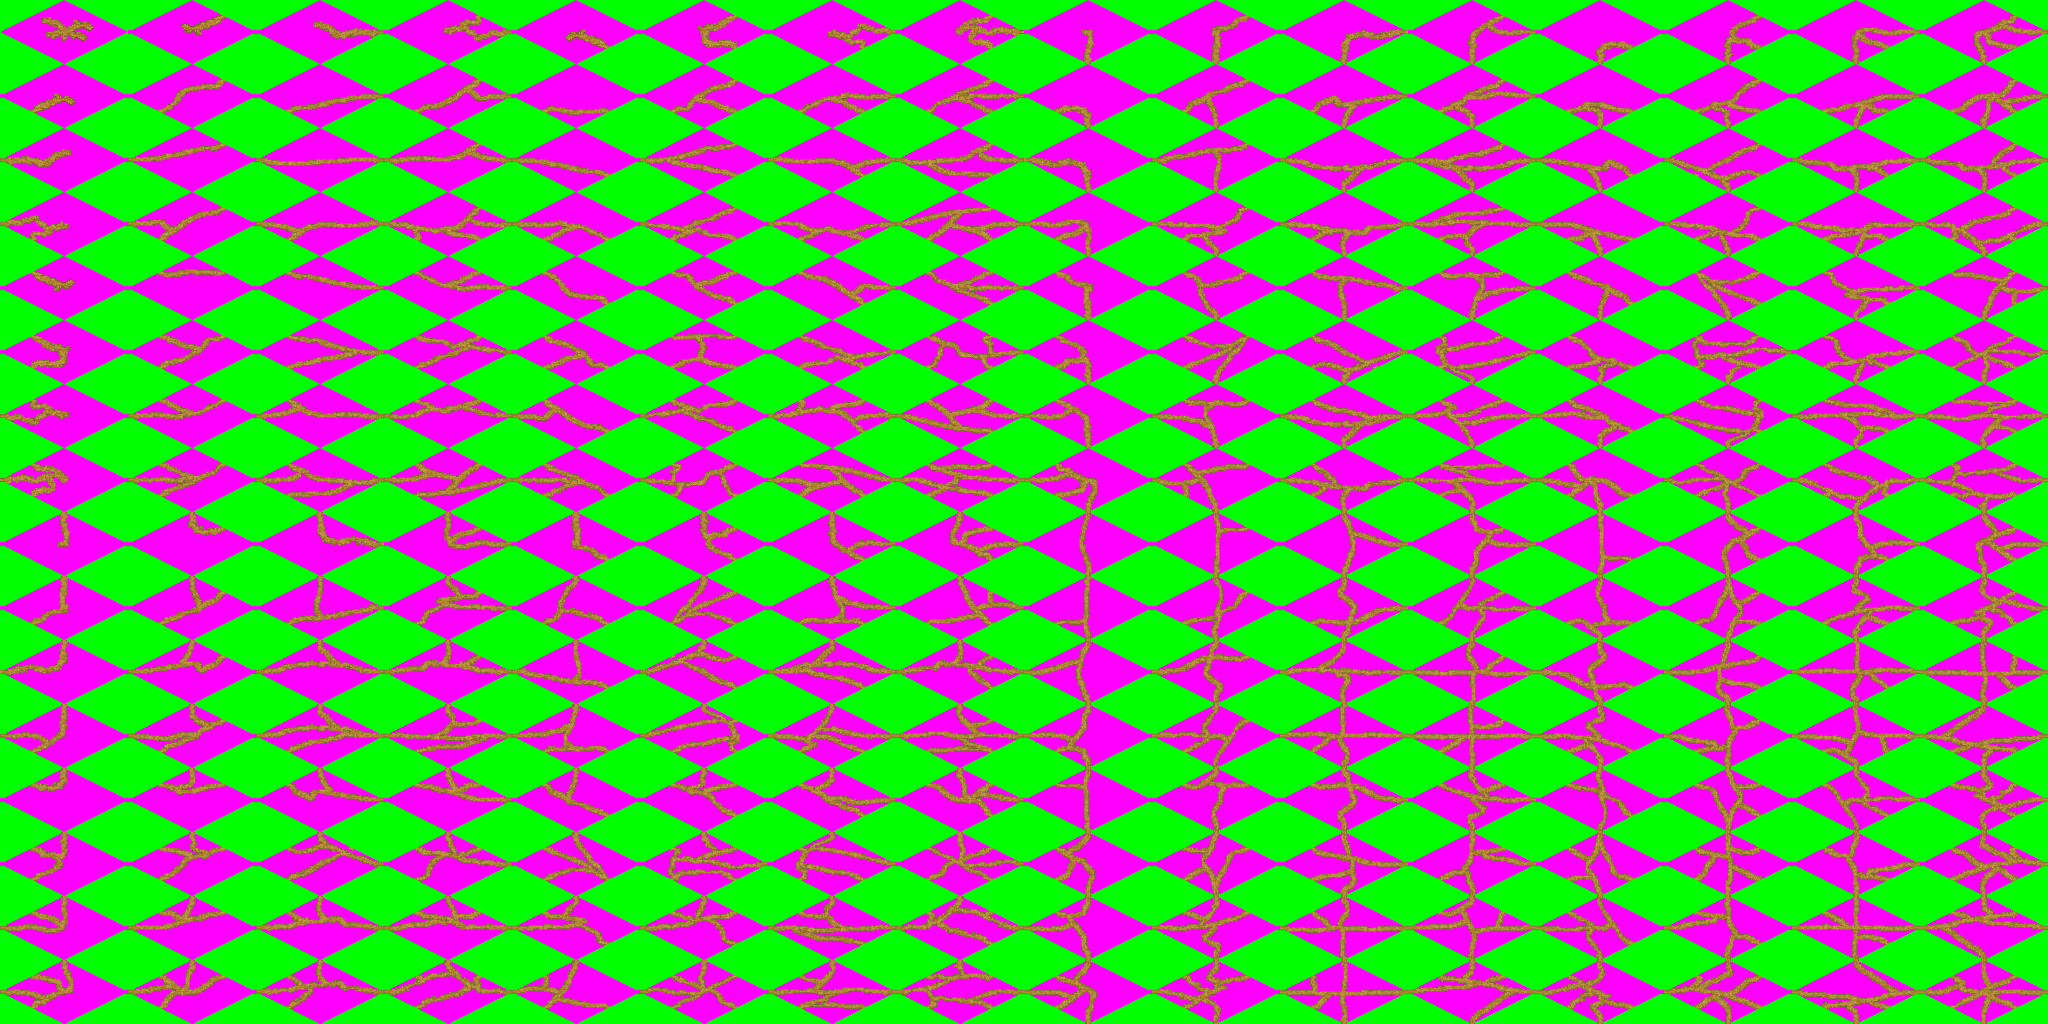
The pink and green are indexed colors that map transparency, in case you aren’t familiar with modding Civ 3. By late game, it was possible to have a road tile on every land space on the map. I used to poke holes in my road networks just so I could get variety in my tile set. That was the advantage of making every single tile unique – it was artistically beautiful.
When you only have 13 options, redundancy is inevitable. There really isn’t a whole lot you can do about it either. It’s one of the great sacrifices that can’t be undone, and usually one that is decided early in the design process just to avoid second guessing mid-development. In the case of Empire Deluxe, the developer would have to allow the option of stacking tile sets to get around this, something his engine may not be able to do since it appears to pre-render sprites during the program initialization.
All that said, there are workarounds which can lessen the problem. To break up the redundancy one trick is to add depth. In my road tiles, you will see I’ve attempted to add a bevel. I also do not make a direct path to the connection point and instead moved the central connection point slightly offset. This can sometimes make it hard to render on engines that allow zooming, but it can also give a reason to make it less monotonous.
Limitation 3: Alpha Channels Don’t Zoom
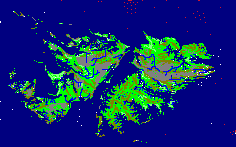
Take a look at these two side by side images. I chose a low contrast file (black on blue) to help make the issue more visible.
|
|
|

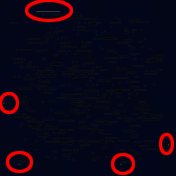
This is what happens when you start zooming files in and out. Both of these files are using only one color (black #000000) and an 8-bit alpha channel to define the transparency. When you start zooming in and out, you start getting white/gray artifacts. This is the game’s rendering engine attempting to programmatically resolve how to handle making the images smaller/larger than their default size. Unfortunately, there are many different ways to handle this. Here are two:
- Use a transformation approach (modifies the image it renders on the fly). This causes images to become blurry but is often the safest avenue to avoid pixelated images. It’s really the only option if zoom ranges are intense, I’m talking over 500% difference, or when you have text.
- Use a nearest neighbor approach (algorithmically determines what to delete/merge). This is when an algorithm divides the image size by the zoom amount then adds or removes pixels at even intervals attempting to fill in gaps. This method is popular with 8-bit technology and files that rely on indexed RGB channels.
In the case of Empire Deluxe, it’s using option #2. However, the images are pre-rendered with this in mind and as a result sometimes the alpha channel “guesses” using a form of option #1 which causes artifacts to appear. If you look at the images above, the image to the right shows this issue. In this case, the alpha channel, which I set at 0% and 100% for every pixel, did a division on the alpha channel on two neighbors which caused it to appear with a 50% transparency. Unfortunately, because I did not provide an RGBA value to that pixel, it renders as you see it “partially white”.
The image on the left shows the correction. I applied black pixel to each corner of the file. The four black pixels are not visible because the image scaling removes these corner pixels, and in turn is causing the blending of the alpha channel.
To explain it another way, remember the first totally black image I posted at the top of this post? I effectively did that here, where I told the engine to render all tiles as black if the alpha channel is > 0%. That’s why you don’t see that issue on the file in the left.
If you viewed the source file of supplies that I made, you’ll notice that I only had to do this to the four corners of the file. That is because there will be instances where you need a partial alpha channel, so a solution that required the entire alpha channel to be painted black won’t qualify. What I did was eliminate this only on the four pixels that cause the issue. In this case, it forces the game to render the entire file in it’s intended size (128×128) instead of trying to programatically determine the intended size and adjust is accordingly.
Said another way, if your program tries to re-size images programatically, make sure your four corners have a color mapped to it if you are getting white borders to appear.
Conclusion
So there you have it. In short, here are the two tricks I recommend when working with PNG files that have alpha channels, and game engine with zoom capability.
- When possible, make sure your alpha channels are sharp (no gradients).
- Place a colored (black works best) pixel on the four corners of larger sprites so the game won’t attempt to dynamically render them. These pixels are usually invisible in-game if zoom is enabled or you set the alpha channel to make them invisible.
Anyway, now that this is out of the way it’s time for me to decide what my next project will be, whether its improving something I already posted or working on something brand new.

One Comment