Empire Deluxe Tournament 2020 – Game 1
 Our first game of EDT 2020 has been completed and, depending on which player you were watching, it was either a nail biter or a slumberfest. Our players have already debriefed and declared a winner. They have started Round 2 which will conclude in the next two days and the results will be posted. As for the final scores, those will not occur until next week when the team has a chance to convene and declare the winner, hand out titles, and receive their trophies.
As is tradition, we are using the Tournament Scoring rules outlined on the rule page of this website. Any set matches declared by a player will be shown in Black in the summary provided and any player-specific information will be shown in the color they chose during the initial setup.
Game One Draft
We have four players participating in the final championship this year. The draft order for Game One is determined by the number of points accumulated during qualifier matches throughout the year. Below are the starting locations and colors chosen by our participants for this game.
| Player Name | Empire Name | Location |
| Niefsa | Keiren | Orbaal, Northeast |
| Dalian | Sarkum | Ternu Heath, Southwest |
| Holak | Thay | Anadel, East |
| Mara | Kustan | Peran, Northwest |
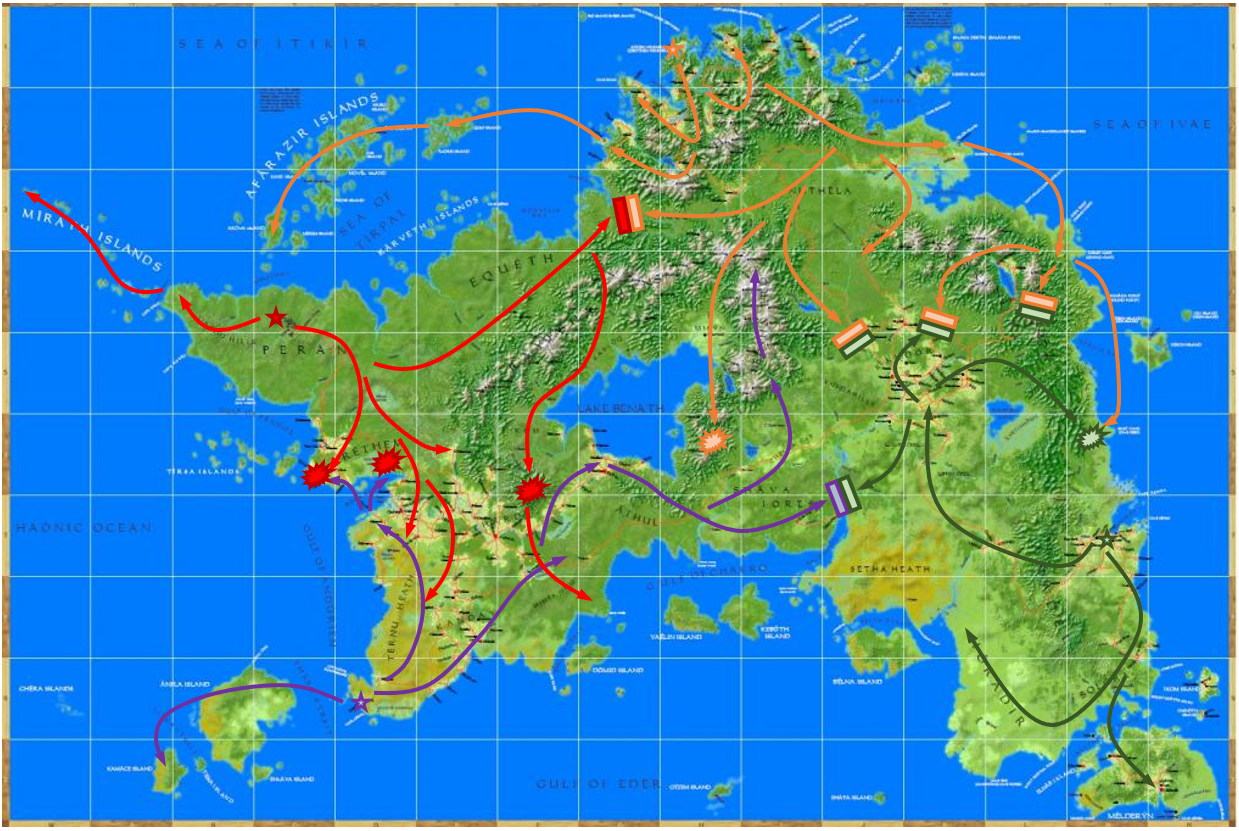
Order of Events Battle Map
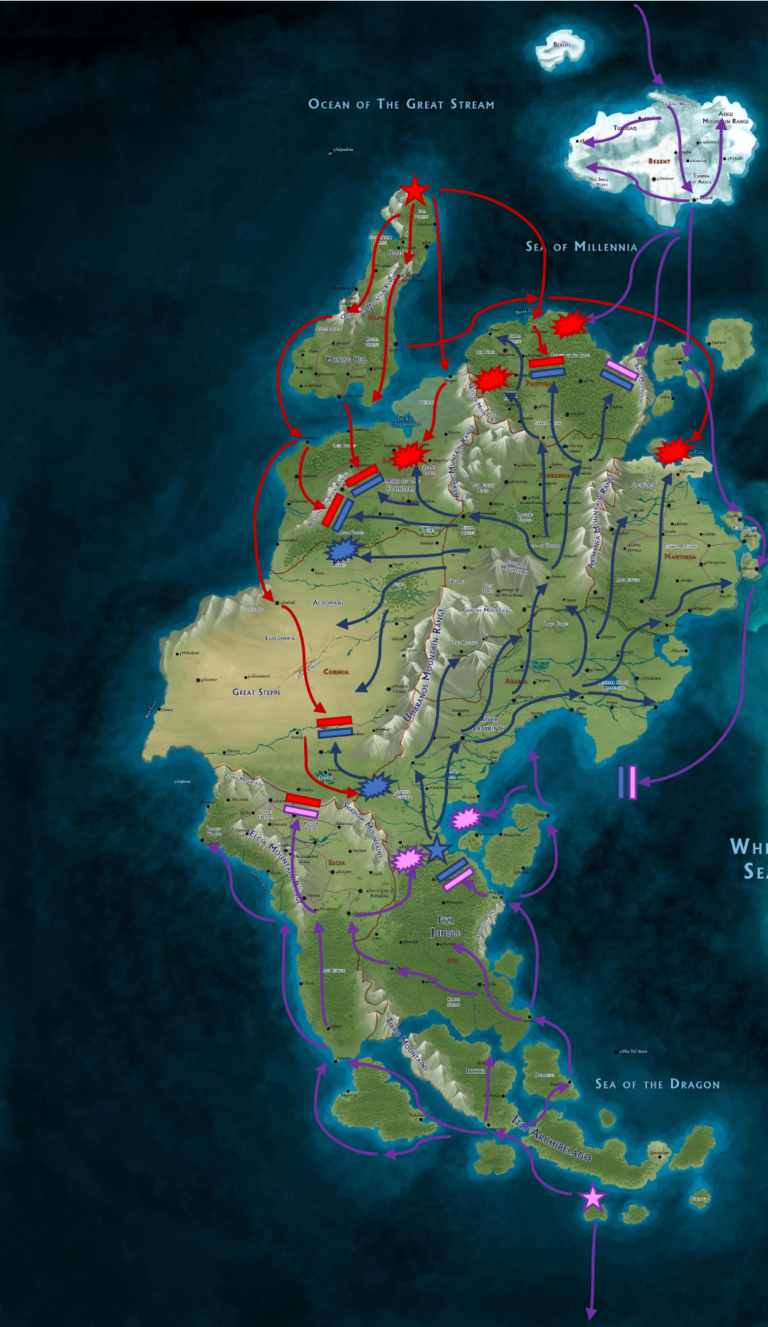
Below is the battle map showing the order of major events. Stars indicate main locations and capitols. Lines indicate movement of major forces. Explosions indicate a major set match battle or a decisive victory with color representing the winner. Two parallel bars represents an inconclusive engagement, or an incomplete set match at end of game.
Moderator’s Game Summary
In our first match, players chose Thay, Sarkum, Kustan, and Keiren. The early game was uneventful seeing all four players expand throughout their pre-designated empires. The action started at Turn 150 with a small Skirmish at Ithiko after the fast expanding Sarkum armies met the advanced forces of Kustan while crossing Boka Bay. However, this skirmish would be short lived with a cease fire. Per the terms of the agreement, Rethem would be permanently ceded to Kustan for the time being. This agreement allowed both empires to expand east quickly, with Sarkum taking all of Athul, Felsha, and Shava. On the northern side of the lake, Kustan would take all of Equeth before getting stuck in the mountain passes between Rayesha and Orbaal.
On the east side of the map, Thay and Keiren advanced largely unopposed across the vast terrain. Thay slogged to the south before wheeling clockwise and eventually capturing the rich cities in Kaldor. The decision to head south initially would later be considered a pivotal point in the game. As for Keiren, their expansion was noticeably smaller in terms of total territory. Instead, they focused on building up their cities and fortified the Jahl Mountains. This put them in last place on the scoreboard, but as we would see in mid-game this would end up as a worthy investment.
During the middle game, the first major battle would be the full scale Invasion of Ithiko which would see Sarkum break the cease fire with a full amphibious assault on Boka Bay. Kustan fought them off at significant cost in manpower and infrastructure, ultimately repelling the invasion but losing its entire air force. What would follow is a virtual slaughter as the Assault of Boka Bay would be immediately initiated by a Kustan counter-offensive. In this battle, Kustan redirected all of its military forces from Peran, Mirath, and Rethem causing a slow and steady battle of attrition that would wear down the Sarkum defenses until they captured a completely destroyed Golatha and crossed the Thard River. This battle would last for the rest of the game despite the complete devastation of the area. At the same time, Kustan directed its entire force in Equeth to cross the Rayesha Mountains in an attempted encirclement of Sarkum. It was clear that a grudge had been forged as this tactic left the northern frontiers completely open to attack. With Sarkum fighting for its life in the west, and no reinforcements to send to stop this second invasion, the long assault successfully cut the Sarkum Empire in half. By end game, the Sarkum capitol would be heading for capture, while the eastern half of its empire would thrive and become a future stronghold as it staved off its attackers.
To the east, Thay captured Horadir and Melderyn unopposed before meeting Keiren forces at the Battle of Azadmir. While this battle would remain inconclusive, it was a serious blow to the expansion attempts of Thay who, until this point, were leading on the scoreboard. However, their inability to muster enough units, despite owning a quarter of the continent, to a decisive victory against the north was a serious concern. This would later be cemented when Keiren conducted the suprise Landing at Garin Bay. While the invasion would be repelled by Thay, it was a pyrrhic victory for Thay who had to draw significant forces from other fronts to repel the invasion. This showed Thay‘s lack of naval strength was a vulnerability that could cost them the game. Moreover, it showed the brilliance behind the Keiren strategy. Fortified behind the Jahl Mountains, impervious to a serious land invasion, they chose to built up a significant naval fleet and air force that could not be opposed by any other player. It was revealed they were nearing completion of nukes, a new concept for us Legacy Empire players.
By the end of the game, Thay was being challenged on all fronts and its position was weak at every border. It did not control enough forces to engage in another set match. Their last major attempt at expansion was halted at the Battle of Ulfshafen where Sarkum repelled them at the river with ease. Thay‘s lack of a proper navy became the hammer blow once a patrol spotted a Keiren attack on Melderyn was imminent and it had no way of countering the invasion.
The remnants of Sarkum took Thay off the top spot on the leaderboard with the Battle of Ulfshafen but they were in no better shape themselves. The cease fire agreement that followed allowed Sarkum to solidify their position in Athul and make the best of their serious losses in the west. The capture of their capitol was imminent at this point and they had no easy way of beating Kustan. All they could do is leave scorched earth and ensure Kustan would not win the game once they were defeated. Still, Sarkum possessed strongholds throughout the center of the island, ensuring any defeat would be costly for the invaders.
Kustan had paid dearly to wipe out Sarkum‘s ability to wage war. The scorched earth meant they were not able to replenish their forces quick enough to cover their losses. What started as a highly mobile force was now just an army of foot soldiers slogging through destroyed enemy territory. The narrow focus on eliminating Sarkum would be their downfall though, as patrols spotted a large fleet of Keiren ships heading for the Kadas Straight. With their entire army to the south, there would be nothing left to combat an amphibious assault to their north. To add more disappointment to the situation, it now looked unlikely that Kustan could capture the Sarkum capitol before Keiren would capture Kustan.
As we closed out the game, it was Keiren who was in the winning position. They used the Jahl Mountains to perfection, building a series of bases and chokepoints that kept them safe from artillery and air attack while making ground assaults virtually impossible. Every other nation had focused on the land war, and as such no player was able to oppose the large invastion fleets heading for Kustan and Thay. Moreover, Keiren announced that it had stockpiled nukes ready to be sent against the Sarkum Remnants and, instead of dealing with its scorched earth policy when invaded, would “return the favor” by simply nuking them to oblivion. Effectively, Keiren was able to set their sights on every opponent in the game, a position no one else held and thus the game was decidedly concluded.
Conclusion
Game one belongs to Keiren. As the players put it, “We expected them to play King Maker, not Make themselves King.”
While it’s possible the initial landings (or nuking) of the core empires might have been opposed, it was clear that they had a long road to actually countering and combating Keiren‘s dominance on the map. Moreover, after the game ended, Keiren showed us his strategy, revealing the importance of building up efficiency in well protected cities and the difference it made in late game. While we knew this already, the impact of efficiency and drain is far more important in EDCE than it is on legacy Empire Deluxe. I expect more players to focus towards this strategy during mid-game instead of the attrition style combat we saw this game. By the end of the game, Keiren fleets were sailing along the coast towards Kustan and Thay, almost completely unopposed, and producing fast enough to replenish their losses during invasions. On a map that fully wraps like Harn, this kind of naval power is an important tactical advantage despite being a single continent map.