
Empire Deluxe Tournament 2020 – Game 3
 This is our third and final battle of the 2020 tournament. Due to the performance of our players in the first two games, we elected to try a modified unit database and try some rule variations. After obtaining unanimous approval, the changes were implemented by the moderator and action started. With that, this tournament will go into the books as one of firsts – The first on EDCE, the first to use a modified unit set, the first with true Regicide enabled, and the first to be streamed live.
As is tradition, we are using the Tournament Scoring rules outlined on the rule page of this website. Any set matches declared by a player will be shown in Black in the summary provided and any player-specific information will be shown in the color they chose during the initial setup.
Game One Draft
We have four players participating in the final championship this year. The draft order for Game One is determined by the number of points accumulated during qualifier matches throughout the year. Below are the starting locations and colors chosen by our participants for this game.
| Player Name | Empire Name | Location |
| Niefsa | Kereva | The Balakas, Northeast |
| Dalian | Shava | Shava Forest, South |
| Holak | Solora | Solora, Southeast |
| Mara | Andurien | Tirsa, West |
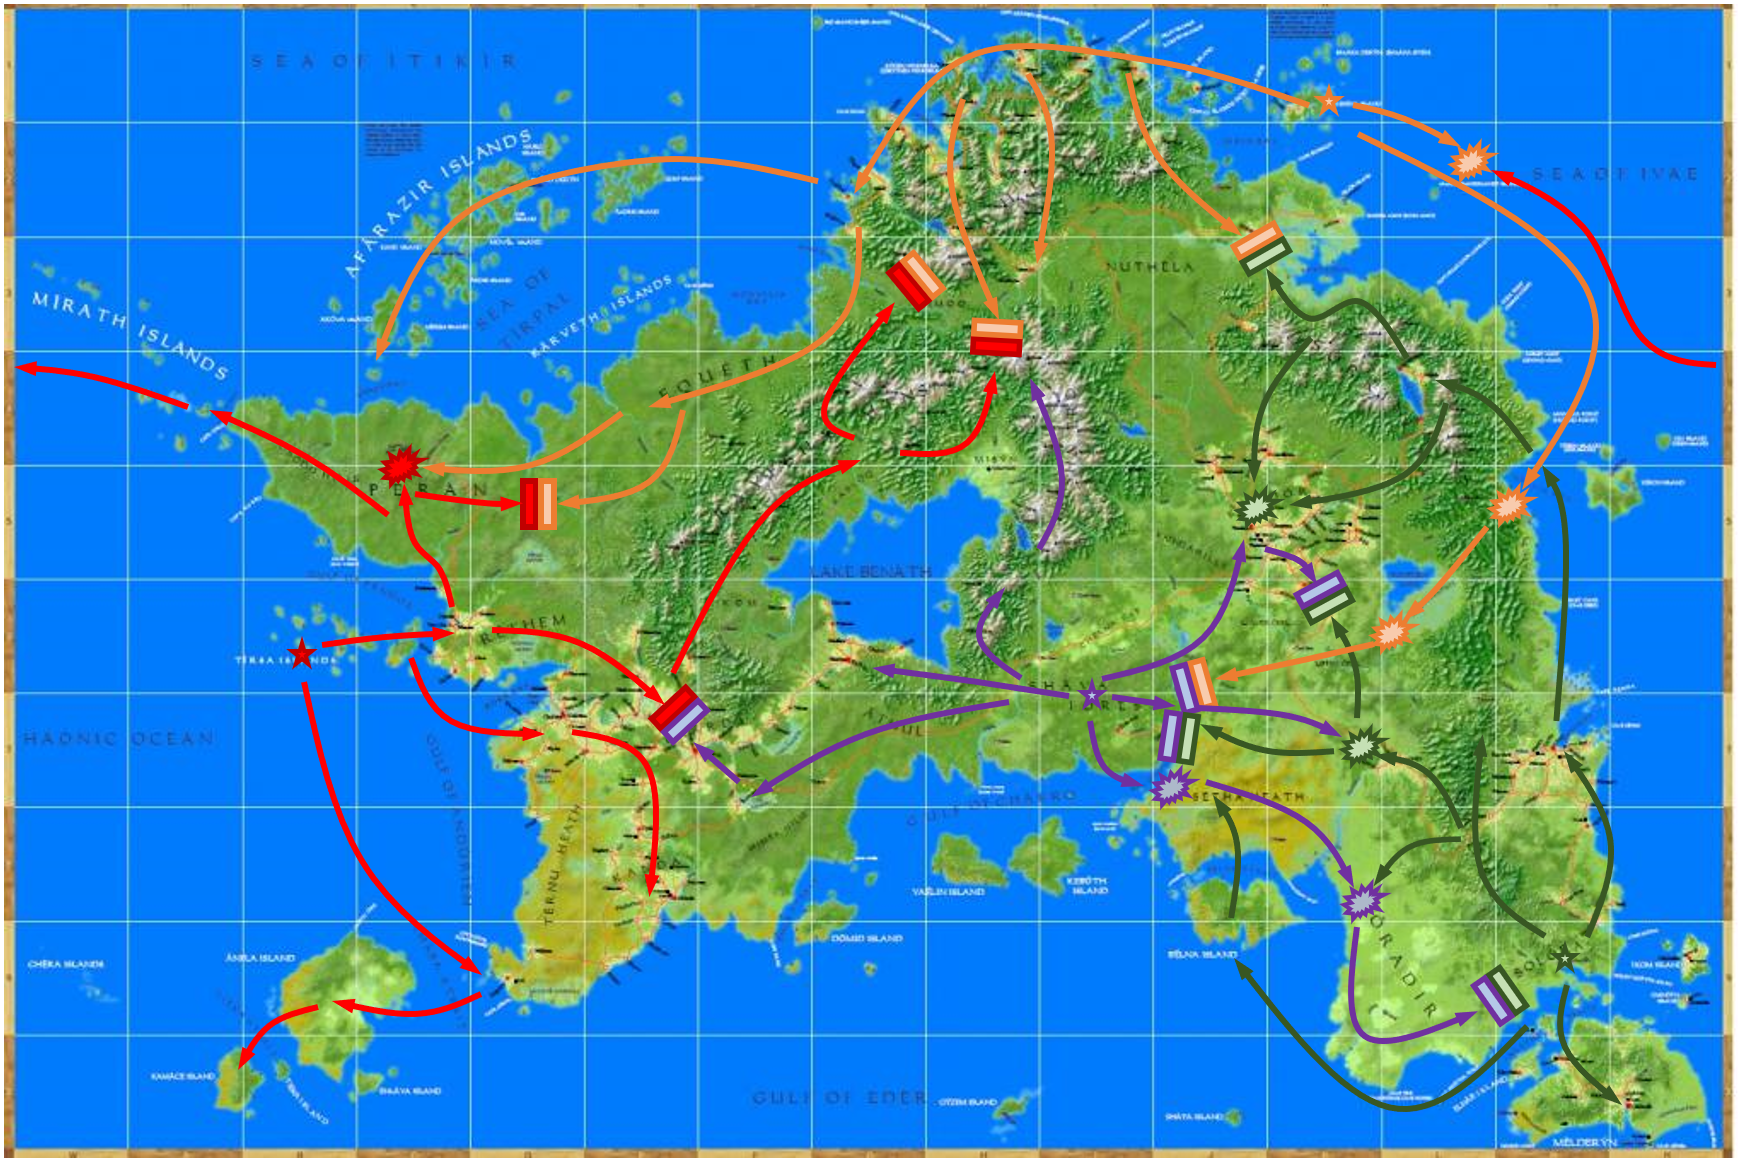
Order of Events Battle Map
Below is the battle map showing the order of major events. Stars indicate main locations and capitols. Lines indicate movement of major forces. Explosions indicate a major set match battle or a decisive victory with color representing the winner. Two parallel bars represents an inconclusive engagement, or an incomplete set match at end of game.
Moderator’s Game Summary
Players opted to make a rule change to implement a Regicide game with two generals each. Generals were given values or three armor and movement like engineers to encourage use. Moreover, aircraft distance was doubled, air transports match bomber’s range, and helicopter ground attack doubled. Players selected Andurien, Kereva, Shava, and Solora as their starting locations for this map.
The starting locations reveal the different strategies of the four players who all believe they have found the method for winning this map. Andurien believes capturing the resource rich Tharda area is the key to victory while avoiding a slog in the forested regions of Perath and Equeth. This is demonstrated in their constant push to the east for the first 150 turns of the game.
Kereva has used the various northern mountain ranges to great effect throughout this entire tournament. The move to the island chain in the northeast is meant to allow a continued focus towards this but also give a base of operations for a secure naval fleet. Unlike Bijo last game, this location is harder to flank from the north due to multiple early warning locations. It’s clear that this winning strategy will be implemented once more in this game.
Shava put emphasis on land expansion. For the past two games, this southern central part of the map has been their strength and the move to start at Shava allows them easier access to the regions that made them successful. Shava Forest, Kaldor, and Athul would all be in their control by mid game. Moreover, they would start building a defensive line in the Felsha Moutnains.
Solora found the expansion out of Melderyn to be time consuming last game and opted for a position in the same general location but on the mainland. This time, their expansion was along the west coast, sending only a token force to the hills in Setha Heath as a blocking force, believing this area to be a waste of resources, but also an important strategic area in case Shava decides to head in this area. By mid-game, they would control Melderyn and Anadel as well as half of the Sorkin Region.
Mid-game started slowly with all sides hesitant to commit to battle. The first set match would be the Battle of Coranan which resulted in a stalemate but Shava holding the city. On the eastern front, the Battle of Sel saw the Shava Expeditionary Force defeated and a retreat back to Ulfshafen where it would hold the line. The only area where Shava continued to expand was in the Kaldor region which was surprisingly absent of players.
To the east, Solora would win the Battle of Sel and start a counter offensive toward Ulfshafen but would not attack the city, instead took the eastern Kald Coast. It reinforced its defensive line and made a move north to fight the Battle of Osel and Qualdris where they would halt their advance. Solora’s advance to the north would finally meet resistance at the Battle of Anoth Bridge against Kereva. Overall, this was a good game for Solora who saw significant territorial gains in mid-game and a decisive victory against Shava.
To the north, Kereva won an important stalemate at the Battle of Anoth Bridge, securing Lorkin and the Bindra Peninsula from invasion. This would become a base for their future submarine fleet that would wreak havoc in the turns to come. Also, Kereva took the forested areas of Equeth, Peran, and the Afarezires with no opposition, until ultimately losing the Battle of Kustan and halting a counter attack at the Battle of Chetul. It seemed that Kereva would once again maintain naval dominance in the northern seas, but instead of setting their sights north they focused their strength to the east.
The loser of mid-game was Andurien who, like so many times before, was stymied by the lackluster cities in the west. It won an important victory at the Battle of Kustan, but was unable to capitalize on the route as they were stopped at the Chetul River. They captured all of Tenru Heath but were unable to pull enough troops from the area to break into the Athul Region. They built a sizeable naval force but, with no shorelines to bombard and all islands in the area captured without resistance, it was not able to see action.
The late game was a flurry of activity. It started when Shava detonated nuclear warheads along the Kald Coast, devastating the Solora defenders and causing a full retreat once their airforce began mopping up units hiding in the Setha Heath. Solora would attempt to stop the Blitz of the Belna Coast but was once again defeated at the Battle of Horadir. It looked like the end for Solora before the Shava supply lines finally slowed them down enough to stop their advance near Solemo. This advance was a costly maneuver for Shava, costing them the Kaldor Region during Solora’s Invasion of Kaldor as well as a suprise assault by Kereva against Ulfshafen. Nonetheless, the blitz and the first actual use of nuclear warheads in a tournament game was to become one of the games highlights.
Solora, seeing its defenses in the west fully collapse, sent all of its forces to stop the invasion. In an attempt to distract Shava, they started a premature Invasion of Kaldor which met with success, ultimately capturing the prize of Kaldor City. This success would be short lived as the Invasion of Garvin Bay saw Kereva cut the Solora empire in half as it advanced into Lake Tontury in an almost straight path towards Ulfshafen. While Solora would ultimately survive to end game and have almost a third of the map under their control, their tactical position was precarious, and it would only take one more blow to knock them out fully.
In the west, Andurien would advance along the western coast of Lake Benath. It manged to nearly double its territorial gains in the late game before being stopped at the Battle of Foy and Battle of Orbaal. Andurien redirected its efforts to complete a full encirclement of Lake Benath while at the same time launching a sea invasion west before being halted at the Naval Engagement of Ivae. While this would normally be considered a fairly strong end game, Andurien’s late game surge went largely unnoticed next to some of the striking victories in other fronts.
Finally, it was Kereva who would have the most surprising end game. The Submarine Fleet of Bindra spotted a large convoy heading directly for Kereva and, over the course of multiple turns, picked off transports one by one. While the fleet would ultimately be completely destroyed, Andurien was forced to turn back as its naval force remained in tact but most of its transports and all of its carriers were sunk. Both fleets would remain depleted and not rebuilt before the end of the game. On the continent, a large force of unescorted transports landed an invasion force at the Invasion of Garvin Bay.
Kereva did no linger after successfully creating a beach head, attempting to completely cut Solora in half. Their plan was to then launch a second offensive in the north to take Azadmere and Kaldor. They were unaware that a second strike by Shava had decimated the Solora forces in the south, and were able to start the Siege of Ulfshafen, completely changing their plans to the north. Shava was forced to stop its Solora invasion, regrouping to reinforce the Setha Heath alongside Solora and defend against the full Kereva offensive. Unfortunately, the game was called before this offensive came to fruition.
Conclusion
As we neared early morning, after a day and a half of non-stop playing, this is where the game would ultimately end. No one would win this map, as everyone was deemed to be in a fairly strong position. Andurien still had a strong land force, having no major defeats all game. Shava had overextended itself but was still in relatively good shape. Solora still controlled a third of the territory on the map despite a depleted military. Kereva’s remained in the best tactical position despite a low city count. However, turns were becoming too long to complete and it was obvious a few more days of non-stop playing would be needed before even one player could be eliminated from the game. Thus, we stopped it here.
Final Result, complete draw. Due to the late end of this game, it was decided to delay the debriefing until the following day. Another post will follow shortly with that detail.